Server
Colocation
Server
Colocation
 CDN
Network
CDN
Network
 Linux Cloud
Hosting
VMware Public
Cloud
Multi-Cloud
Hosting
Cloud
Server Hosting
Linux Cloud
Hosting
VMware Public
Cloud
Multi-Cloud
Hosting
Cloud
Server Hosting
 Kubernetes
 API Gateway
Email routing in cPanel allows you to control how incoming emails are directed to a domain. This setup can be crucial for managing your email delivery based on specific needs, such as forwarding emails to another server, using an external mail service, or handling emails locally.
In this knowledge base, we’ll cover the steps to configure email routing in cPanel.
Let’s get started!
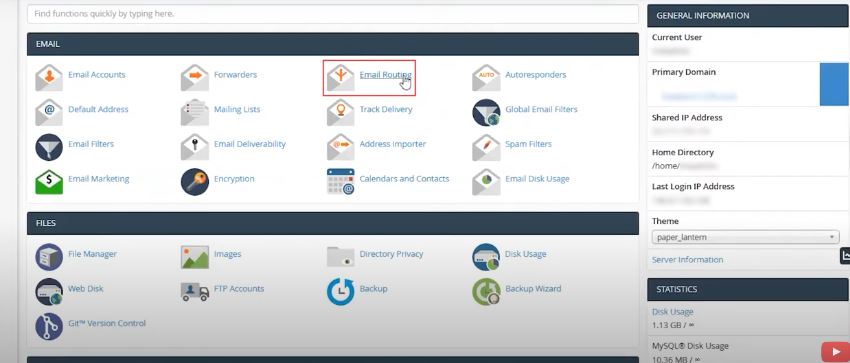
- Log in to your cPanel account.
- In the cPanel dashboard, locate the Email section.
- Click on Email Routing.
- In the Email Routing interface, you will see a dropdown list under Domain.
- Pick the domain for which you want to configure email routing.
- If you have multiple domains–ensure you select the correct one.
You’ll see several routing options, each serving a different purpose:
1. Local Mail Exchanger:
- Choose this if you want cPanel to handle all incoming emails for this domain locally.
- Useful if your server hosts the domain’s email and you want emails delivered directly to your server.
2. Backup Mail Exchanger:
- Select this to configure your server as a backup mail server.
- Emails will only be delivered here if the primary server is unavailable.
3. Remote Mail Exchanger:
- Use this when your email is handled by an external mail server.
- Emails for the domain will be routed to the specified remote server.
4. Automatically Detect Configuration:
- Let cPanel automatically determine the best configuration based on your MX records.
- Recommended if you are unsure which option to choose.
1. After selecting the appropriate email routing option, click Change or Apply.
2. Your email routing configuration will now be updated based on the selected option.
To ensure proper email routing, you might need to verify or update your MX records:
1. Navigate back to the Email section in cPanel.
2. Click on Zone Editor.
3. Find your domain and select Manage.
4. Check the MX records and ensure they match the requirements of your chosen routing option.
- Local Mail Exchanger: Best for domains fully managed within your cPanel account, where no external mail service is used.
- Backup Mail Exchanger: Ideal for ensuring email delivery continuity during the primary mail server's downtime.
- Remote Mail Exchanger: Necessary when using external email services such as Google Workspace or Microsoft 365.
- Automatically Detect Configuration: Convenient for general use where automatic settings are preferred.
- Emails Are Not Being Delivered to the Correct Address. Verify that the correct routing option is selected and that MX records are accurately configured.
- Receiving Duplicate Emails: Check if the same domain is set up on multiple servers with different routing configurations.
- External Mail Service Not Receiving Emails: Ensure that your MX records point to the correct external mail server and that a remote mail exchanger is selected.
Configuring email routing in cPanel is a straightforward process that enhances how emails are managed for your domain. By following these steps, you can effectively route emails to local or remote servers, set up backup mail routing, or let cPanel automatically detect the optimal configuration. For further assistance, refer to the cPanel Documentation or contact your hosting provider.

Let’s talk about the future, and make it happen!

 Pricing
Calculator
Pricing
Calculator
 Power
Power
 Utilities
 VMware
Private Cloud
VMware
Private Cloud VMware on
AWS
VMware on
AWS VMware on
Azure
VMware on
Azure Service
Level Agreement
Service
Level Agreement