Learn about Account, Management and more.
Creating an account in Cyfuture cloud is a simple process that involves five key steps as shown below:
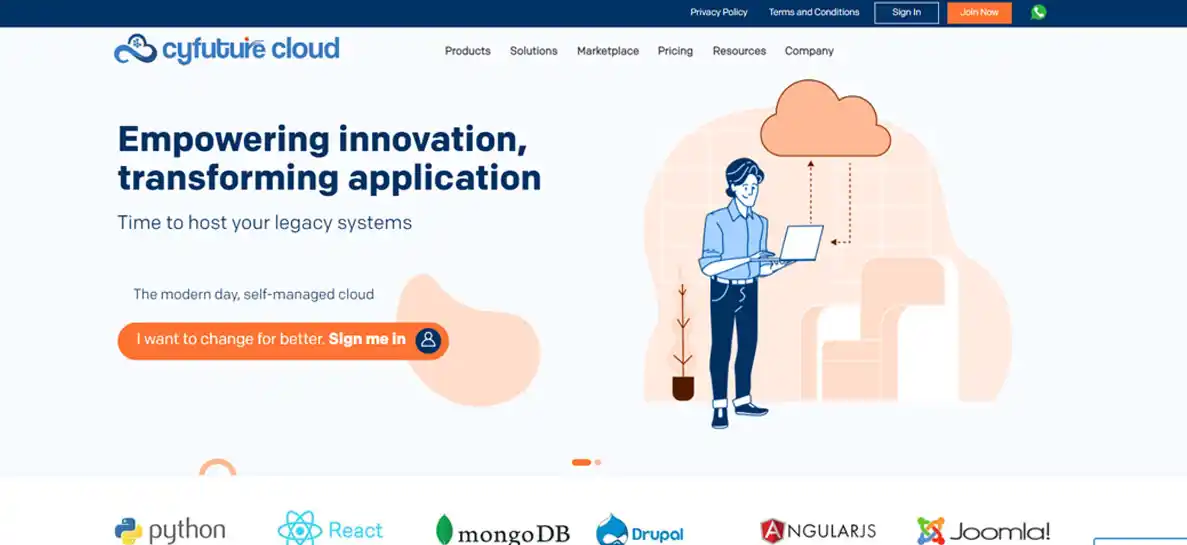
Step 1: Visit the official website of Cyfuture Cloud or follow the link: www.cyfuture.cloud. If already a registered user, click on the “Sign In” button and log in with your existing login credential, else click on “Join Now”
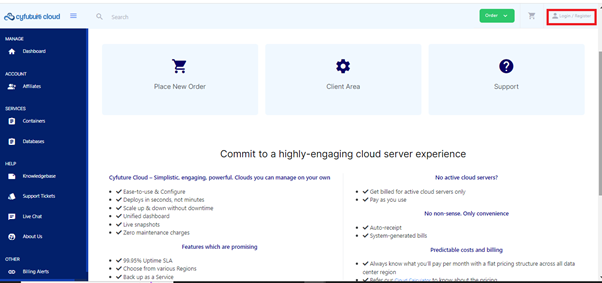
Step 2: The Cyfuture Cloud console portal opens up. Click on “Login/ Register” button available on the extreme right corner of the page that opens up.
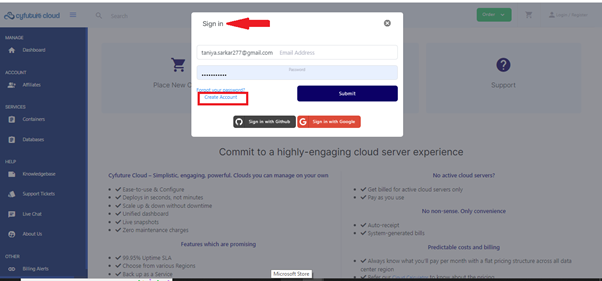
Step 3: If you are a registered user, enter your login credentials, else click on “Create Account” button on the Sign In pop-up that opens up.
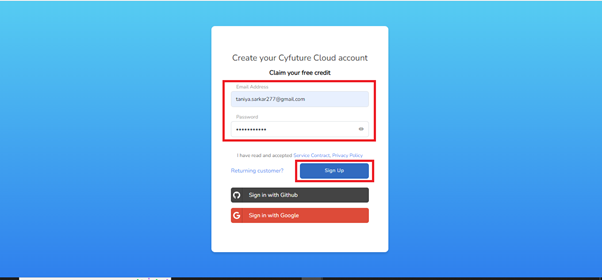
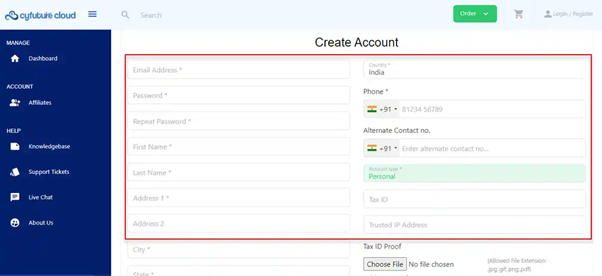
Step 4: Enter your email address and create a new password. Hit the “Sign Up” button, once done. You can also login directly using GitHub or Google.
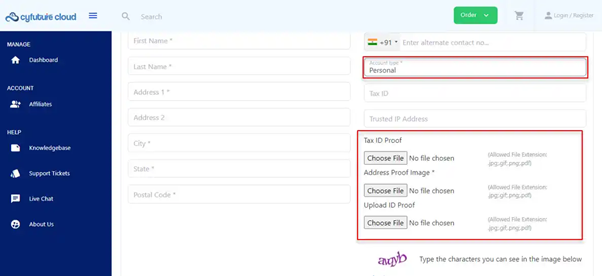
For Account Type: Personal
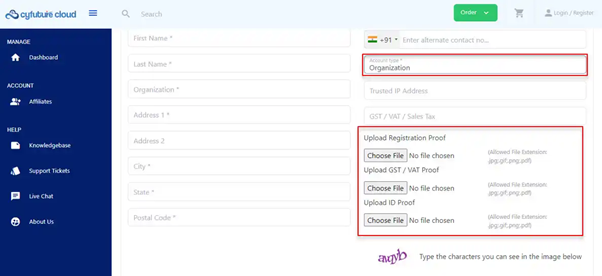
For Account Type: Organization
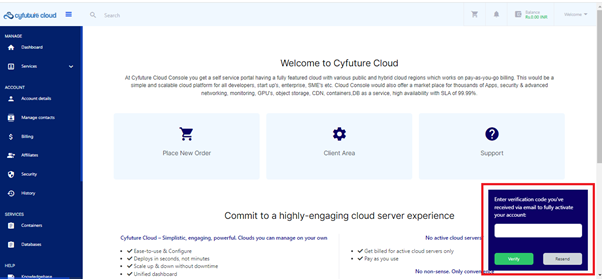
Step 5: Verify your account by entering the code that you receive on your registered gmail account. Once done, hit the verify button. In case, you do not receive the code, check spam folder, else click on “Resend” button.
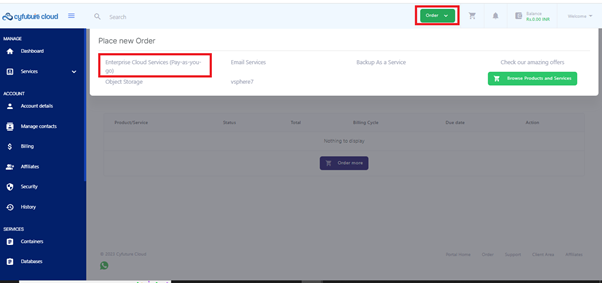
Step 1: Once logged in, click on “Order” button. A drop-down opens up. Under the “Place New Order” section, click on “Enterprise Cloud Services (Pay-as-you-go)”.
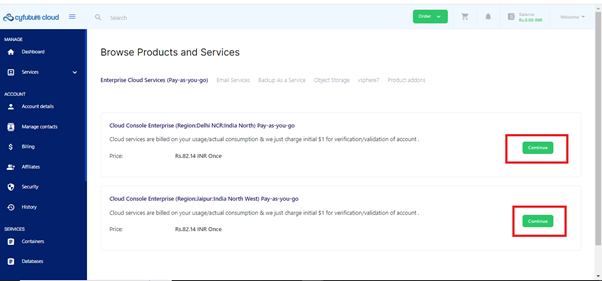
Step 2: Click on the “Continue” button as per the preferred region.
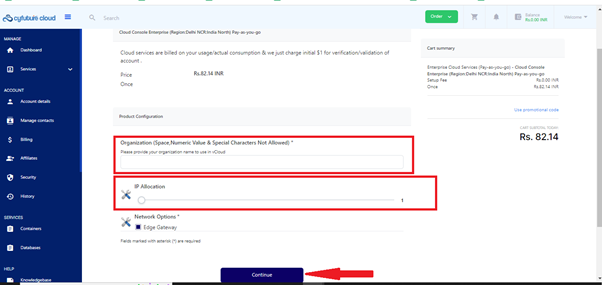
Step 3: Enter your company’s name, select the number of IP allocation and hit the “Continue” button to proceed further.
Step 4: A simple form opens up. Fill in the form by addressing important details, including email ID, password, name, address, mobile number, company name, etc.
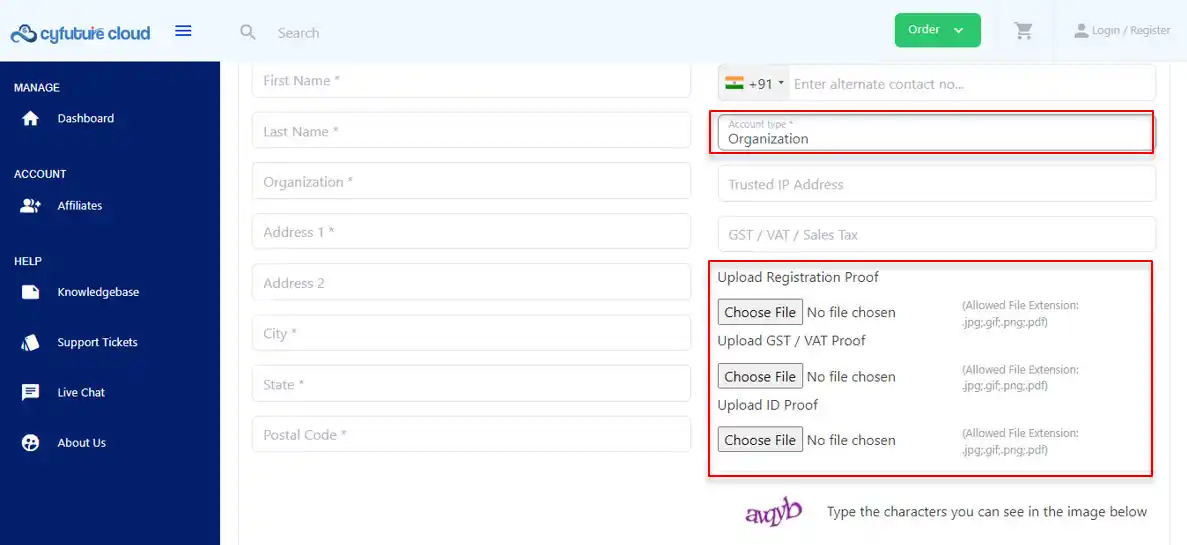
For Account Type: Organization
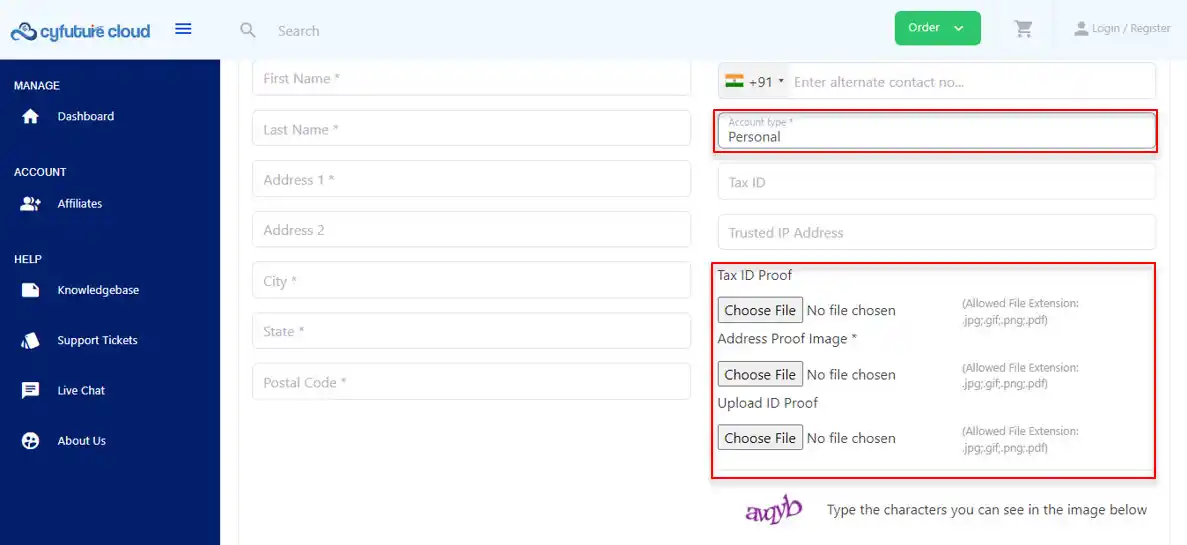
Step 5: Select the account type and validate the details by uploading the required set of documents.
For Account Type: Personal
For Account Type: Organization
Step 6: Enter the captcha code and hit the submit button. You are all set to go. Your account has been created successfully!
You will need three to four simple documents based on the “Account Type” you selected. The allowed file extensions are .webp, .gif, .webp, .pdf.
For Account Type: Personal
- TAX ID Proof
- Address Proof Image
- ID Proof
For Account Type: Organization
- Registration proof
- ID proof
- GST/ VAT proof
No, Cyfuture Cloud offers a single login for both billing and account management. The entire dashboard is well-designed and can be easily operated by anyone using a single login.
The Account Management Panel is a part of the Cyfuture Cloud Console multisite feature that makes it possible for registered users to view the geographically distributed cloud environment as a single entity. Some of the major features include availing services, billing, contacting support, configuring security, managing contacts, and creating VMs and vApps using the login portal.
The account gets approved within 24 hours of signing up. Mostly, it gets activated immediately if all the details are furnished by the user and authentic. However, in most cases, it does not take more than 24 hours for the account to get approved after successful signing up.
It is mandatory for the user to provide the necessary documents for signing up. The submit form button is disabled unless the user uploads the required documents in a valid format. An account can only be created only after uploading all the mandatory documents.
The Cyfuture Cloud Console provides a web-based, graphical user interface that you can use to manage your Cyfuture Cloud projects and resources. It provides role-based access to a web-based tenant portal that allows the members of an organization to interact with the organization's resources to create and work with vApps and virtual machines. For more details, you can follow this link: https://manage.cyfuture.cloud/knowledgebase/article/68/getting-started-with-the-cyfuture-cloud-director-tenant-portal/#section1
The default threshold for credit in the account is 50K post which the user needs to make the payment to further avail of the services. However, in order to alter this threshold, a user can raise a ticket using the support feature through the Cyfuture Account Management Panel.
Learn about support and more.
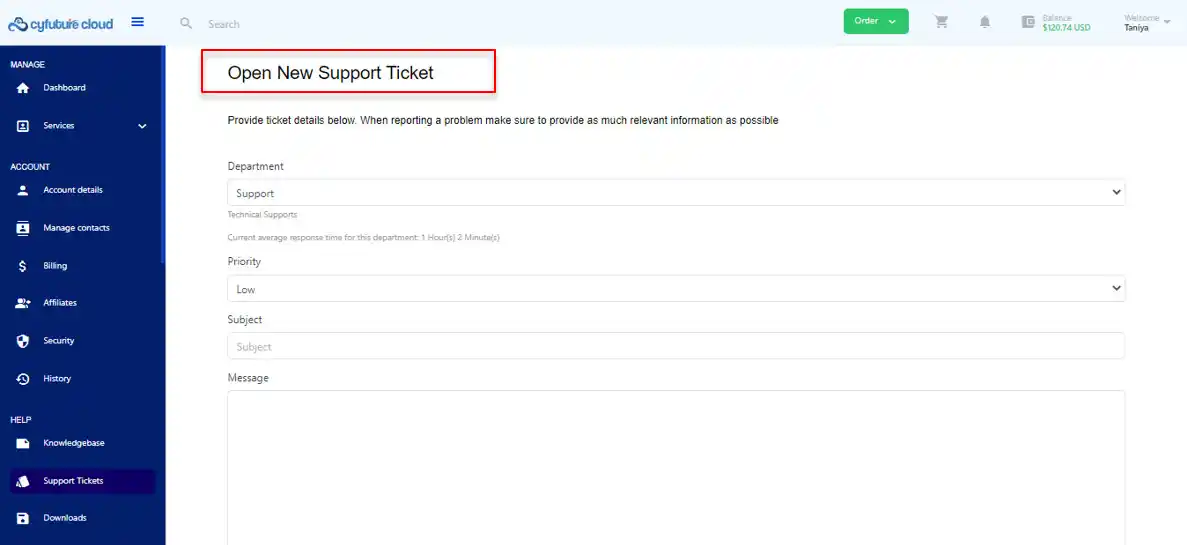
In order to get support at Cyfuture Cloud, scroll down to the Support section and click on “Support Tickets”. Click on “Create New” to raise a support ticket. You can select the department, select priority, and type in the support you are looking for. You can also attach a document to support your concern and hit the submit button.
Currently, Cyfuture Cloud allows raising concerns through support tickets only. However, the support channel of Cyfuture Cloud is available 24*7.
You can start using cloud services immediately after signing up. As soon as you sign up, you need to authenticate your account by making a payment of $1 through PayPal or RazorPay. Once the payment is done and approved by our support team, you can start using your services without any delay.
Yes, you can refer to the knowledge base available on the Cloud Account Panel. It has all the details with screenshots that can help you in setting up cloud infrastructure and machines. Here are the links:
Getting Started With The Cyfuture Cloud Console:
https://manage.cyfuture.cloud/index.php?/knowledgebase/article/68/getting-started-with-the-cyfuture-cloud-tenant-portal/
How To Create An Account On Cyfuture Cloud Portal: https://manage.cyfuture.cloud/index.php?/knowledgebase/article/77/help-file-how-to-create-account-on-cyfuture-cloud-portal-/
How To Operate Cyfuture Cloud Console For Creating Virtual Machine And Networks: https://manage.cyfuture.cloud/index.php?/knowledgebase/article/65/help-guide-operate-cyfuture-cloud-console-for-creating-virtual-machine-and-networks-/
However, in order to avail of in-person paid services, you can raise a ticket through the support section. One of our cloud engineers will get back to you with pricing and plans for 360-degree cloud training.
No, managed services are not included in the costs. In order to avail of managed services, you need to buy the plan separately. The charges for the same can be calculated using the below-given link: https://cyfuture.cloud/pricing
Yes, Cyfuture Cloud offers premium support services that involve complete training in setting up cloud infrastructure and machines. In order to avail of premium support services, you can raise a ticket through the support section. One of our cloud engineers will get back to you with pricing and plans for 360-degree cloud training.
Learn about billing and more.
Cyfuture Cloud offers a pay-as-you-go service which means you need to pay only for the services you avail of. As soon as you sign up and authenticate your account, you can get a month’s free trial. After the free trial period gets over, you will be charged for the services you utilize. The maximum threshold after which the bill is generated is 50K. Upon payment of the bill, you can restart utilizing your services on the pay-as-you-go model.
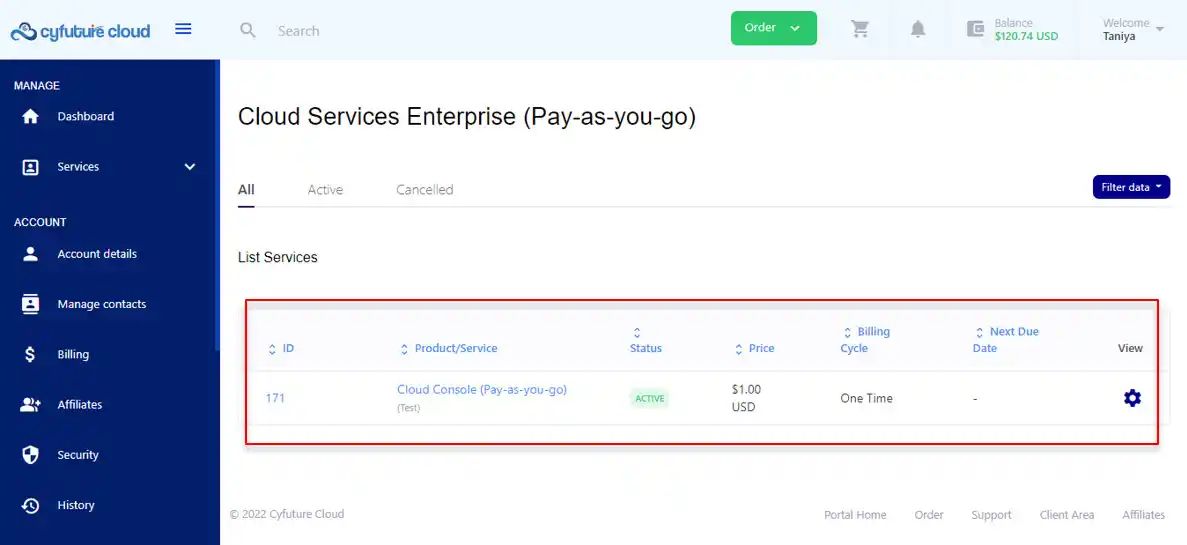
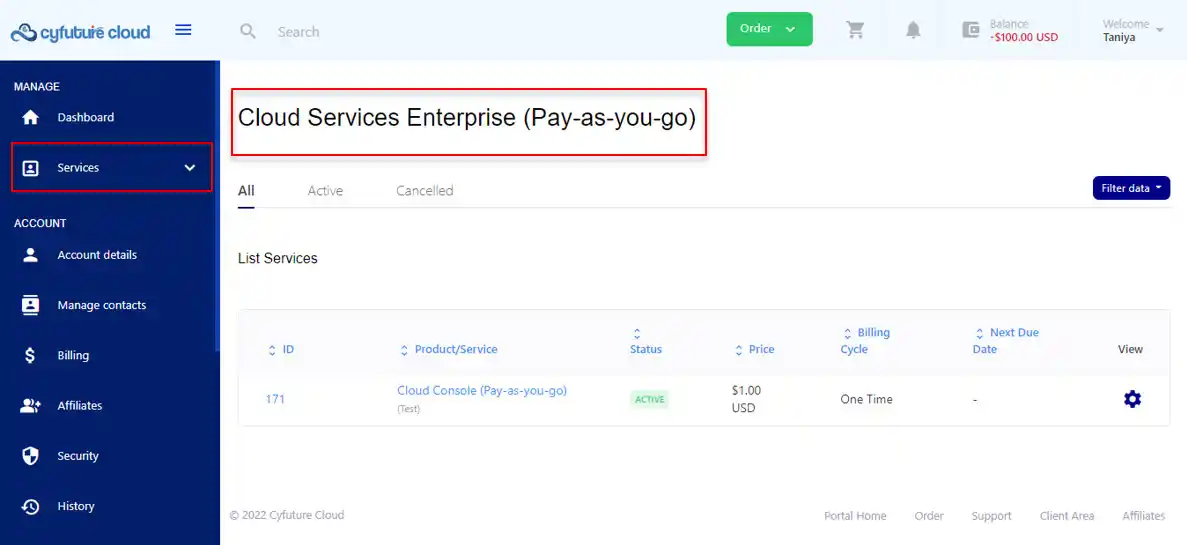
You can check your consumption on the Services page. This page shows you all the active and canceled plans you have with the Cyfuture Cloud account along with status, pricing, billing cycle, and next payment due date.
Yes, the consumption details can be viewed on a real-time basis. To view the same, you can visit the billing section and all your pending bills alongside consumption will be visible on the same page. The page also gives an option of filtering the data through which you can check the latest or the consumption details of the desired period.
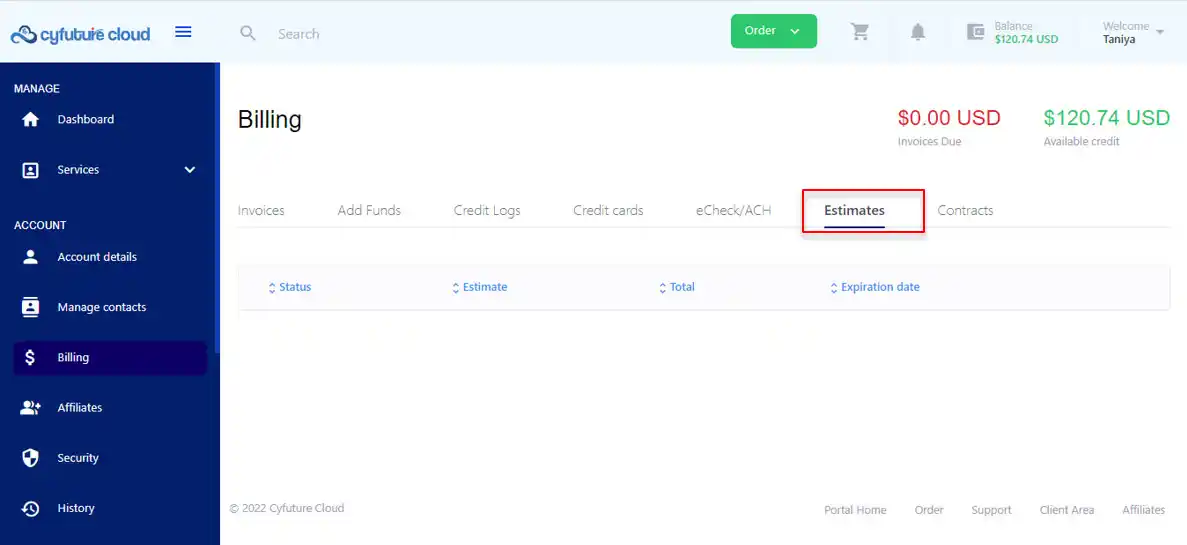
Yes, you can estimate your costs through the billing section. As soon as you click on the “Billing” section, you need to hover your cursor on the “Estimates” tab. Here you can view all the cost estimates that you have asked for.
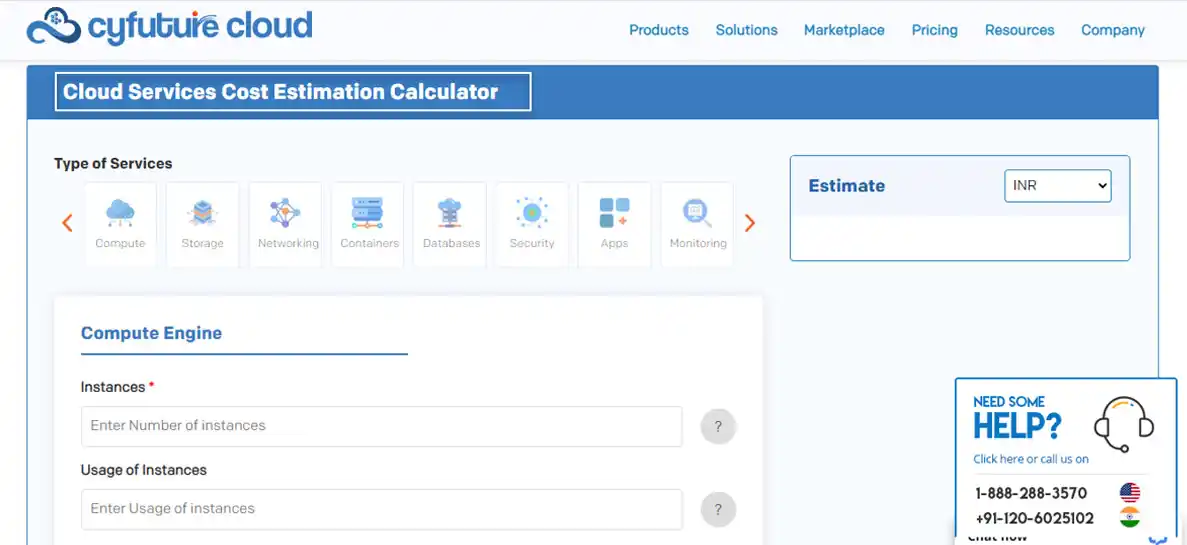
In case you wish to estimate the average cost of the services, you can visit the pricing tab on the Cyfuture Cloud website or directly follow this link: https://cyfuture.cloud/cloud-cost-calculator. On this page, you can type in your requirements through which you can generate the average estimate of the cost for the services you require.
No, you do not have to pay anything in advice except $1 USD while authenticating the account after you sign in. Apart from this, Cyfuture Cloud service is available on a pay-as-you-go model, hence all the services can be availed on a post-pay basis.
There are two ways to pay your balance. Both payment methods are discussed below:
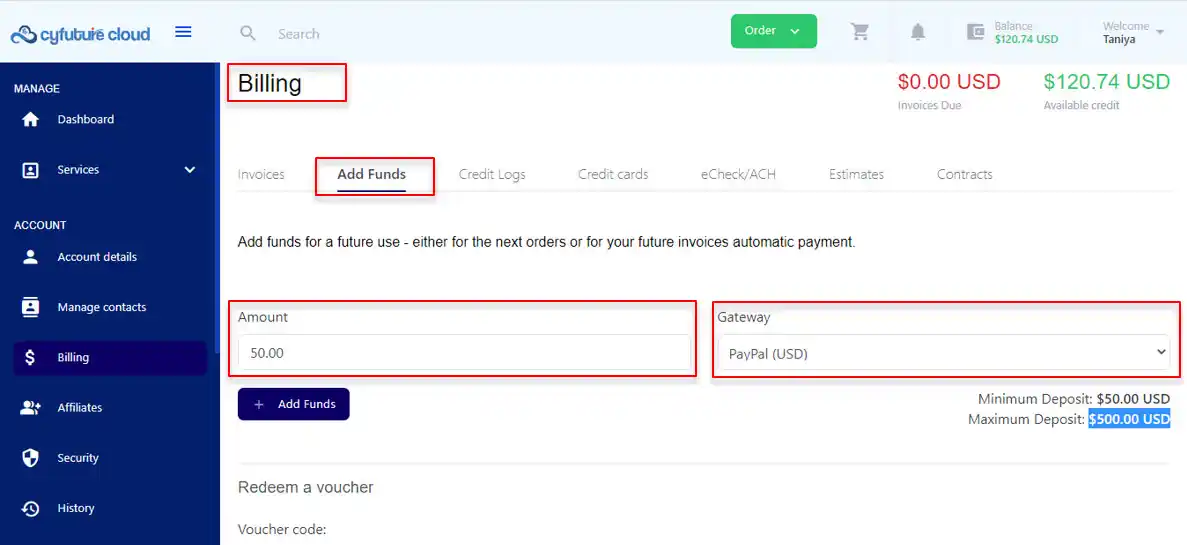
Method 1: You can directly add funds to your account using PayPal or RazorPay gateway and as soon as your threshold for the services you are availing crosses, you can pay it using your account funds. Here the minimum and maximum deposits are $50.00 USD and $500.00 USD, respectively.
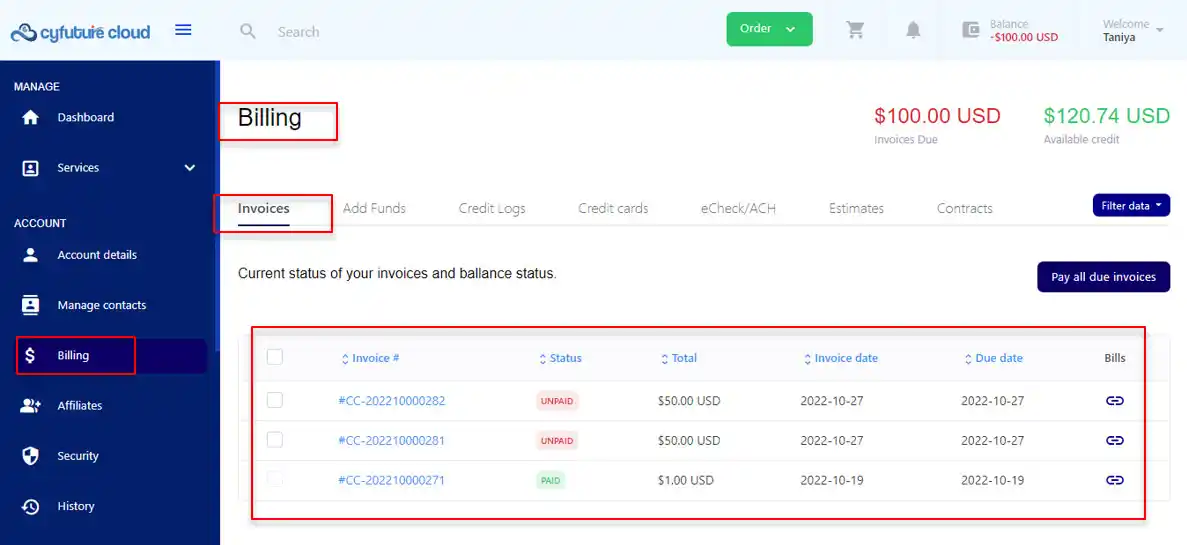
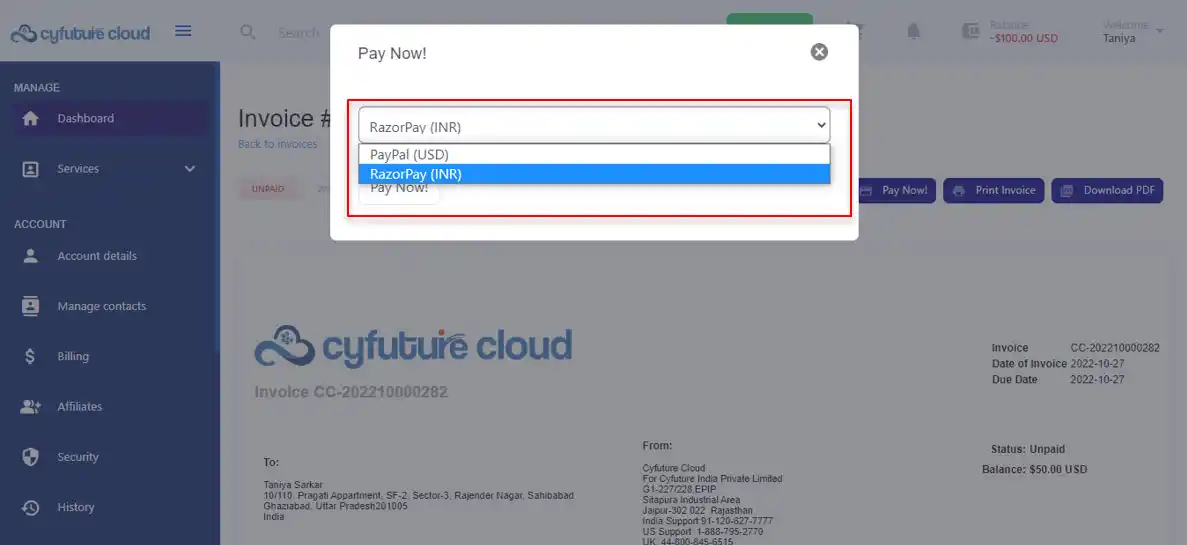
Method 2: In this method, you will find your due amount in the “Invoices Due” section. As soon as you click on “Billing”, in the invoices tab, you will be able to see the status which will reflect paid or due. You can directly click on the unpaid invoice and pay the due amount using PayPal or RazorPay gateway.
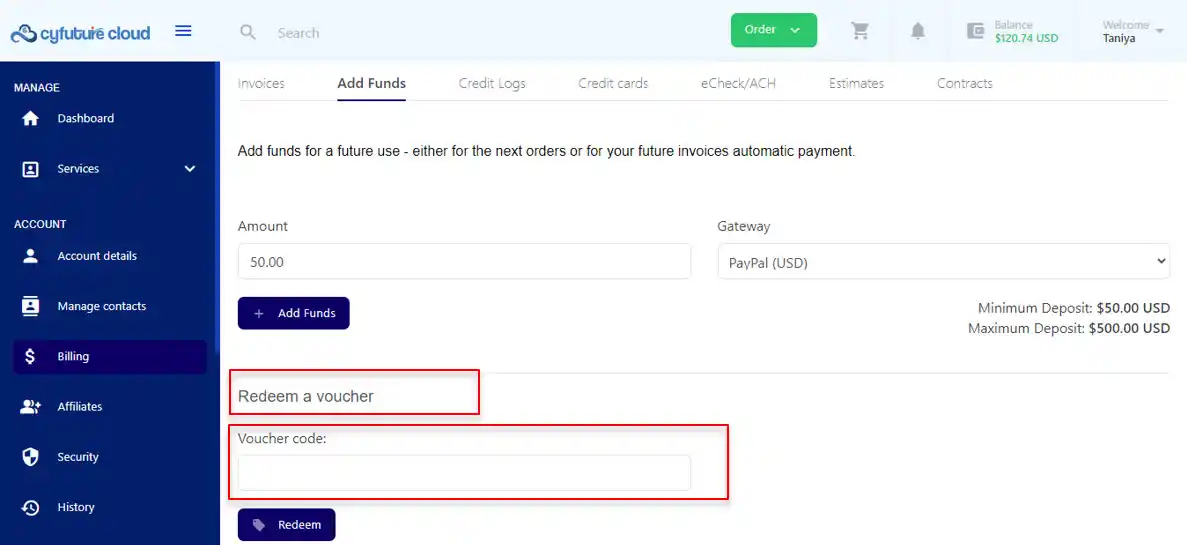
Currently, no free credits are available for the customers. However, Cyfuture Cloud keeps on bringing up new coupon codes and vouchers for their customers on a time-to-time basis which can be availed to add free credits to your account. In order to redeem a voucher, you need to visit the billing section and click on the “Add Funds” tab. Scroll to the bottom of the page to find the “Redeem a Voucher” section. You can add a valid coupon code in the available space and hit the “Redeem” button to add free credits to your account.
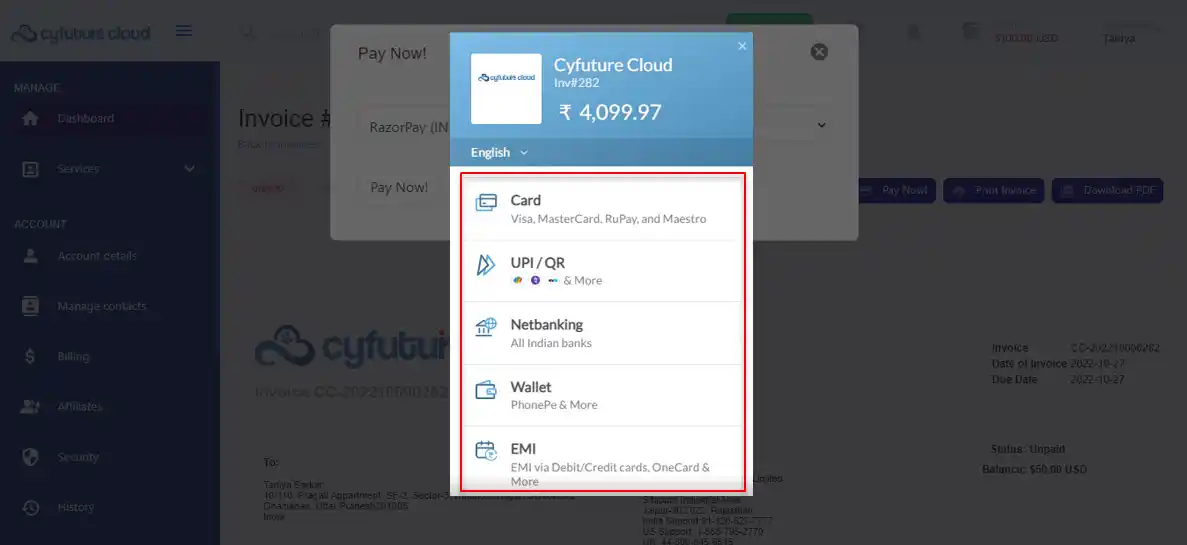
No, there is no default payment method. You need to choose from PayPal or RazorPay to make the payment. Through RazorPay gateway, you can choose to make the payment using a debit card/ credit card/wallet/ UPI/ net banking.
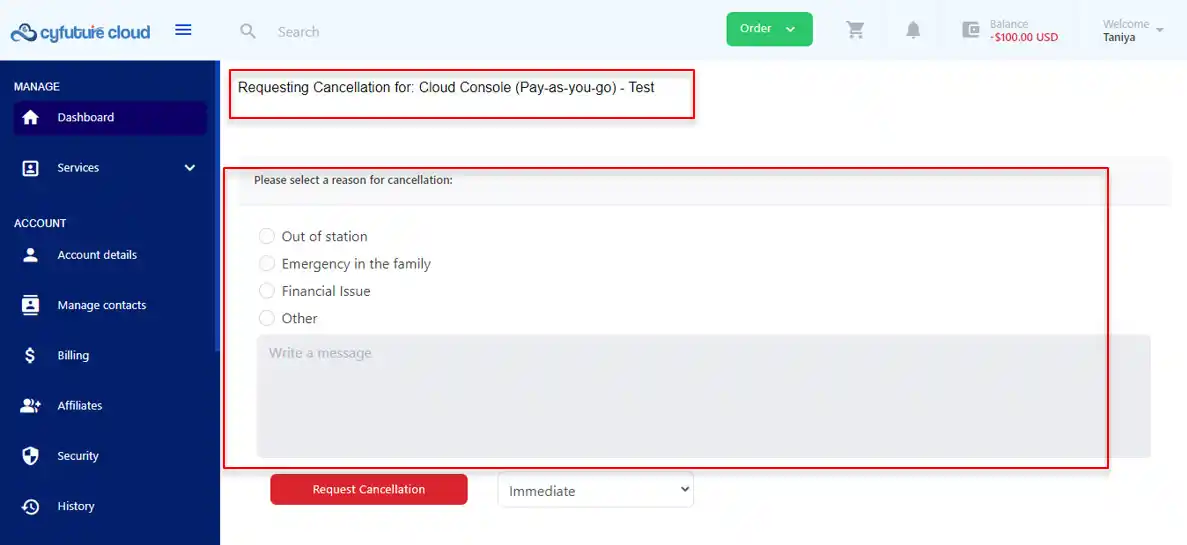
In order to cancel your services, you need to follow the below-given steps:
Step 1: Click on the “Services” tab and then click on the service which you wish to cancel.
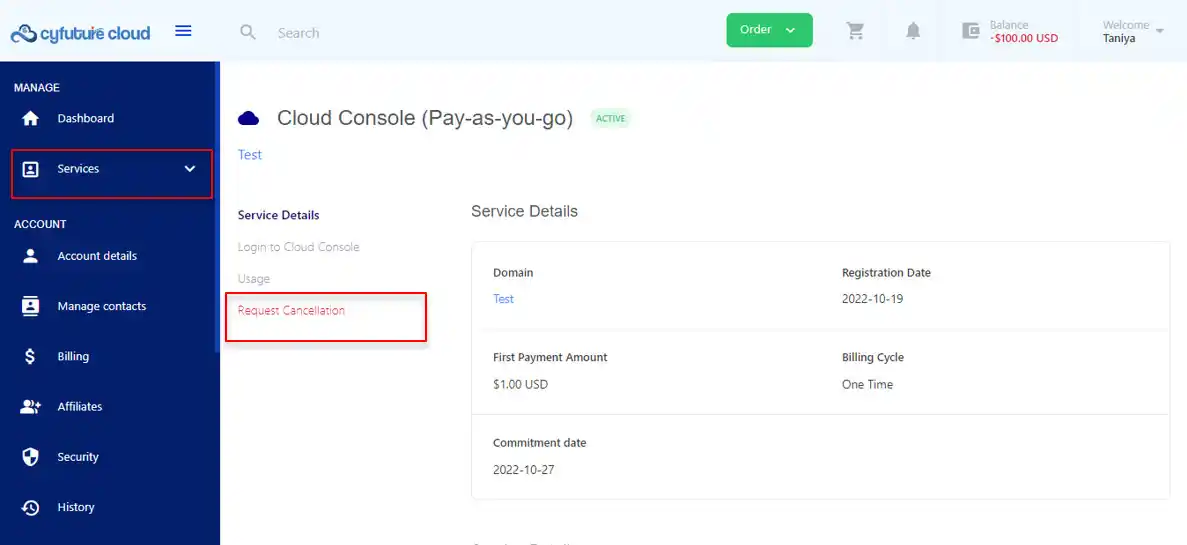
Step 2: In the window that opens up, click on the “Request Cancellation” button.
Step 3: Select the reason for cancellation and type any additional comments if you wish to add and hit the “Request Cancellation” button to confirm the cancellation of your service.
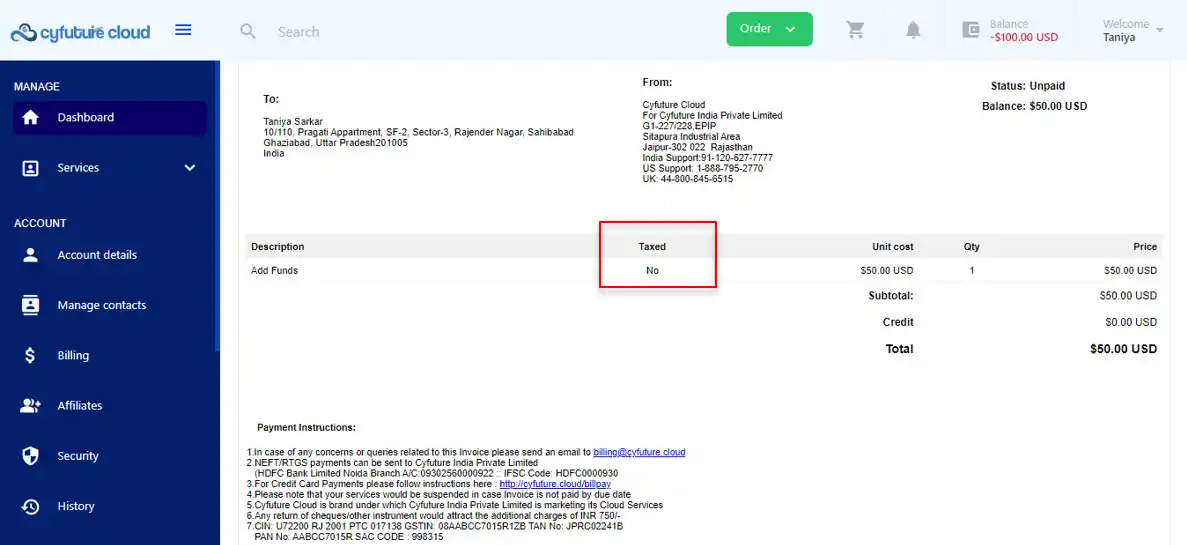
No, Cyfurure Cloud currently does not charge any tax on the services. You just need to pay for the services you are using on a pay-as-you-go basis. Attached below is a sample invoice that gives a clear view of the bill generated by Cyfuture Cloud for its services.
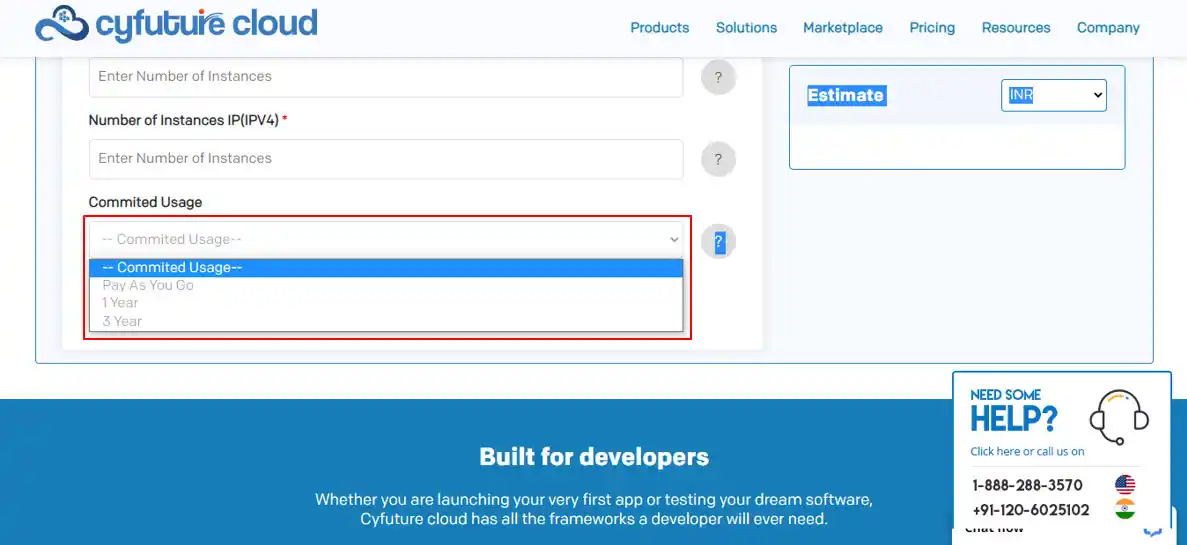
Currently, Cyfuture Cloud has three different billing plans, including Pay As You Go, 1 Year, and 3 Years. While Pay As You Go is a post-pay basis plan in which you need to make the payment after you have availed of the required amount of services and reached the maximum threshold. While in the other two billing plans, including 1 Year and 3 Years, you are required to make an advance payment for the respective term to avail of the services.
Learn about security and more.
Cyfuture Cloud is provisioned with a two-way firewall that filters out any oncoming and outgoing traffic before it leaves or enters the system, thus helping to bring down the possibility of an attack as minimal as possible. It allows you to go beyond the barriers and work without worrying about jeopardizing your system. Apart from the online security, in order to ensure 360-degree protection, Cyfuture Cloud has reinforced the data centers with high walls, CCTV surveillance, and fire & anti-theft systems.
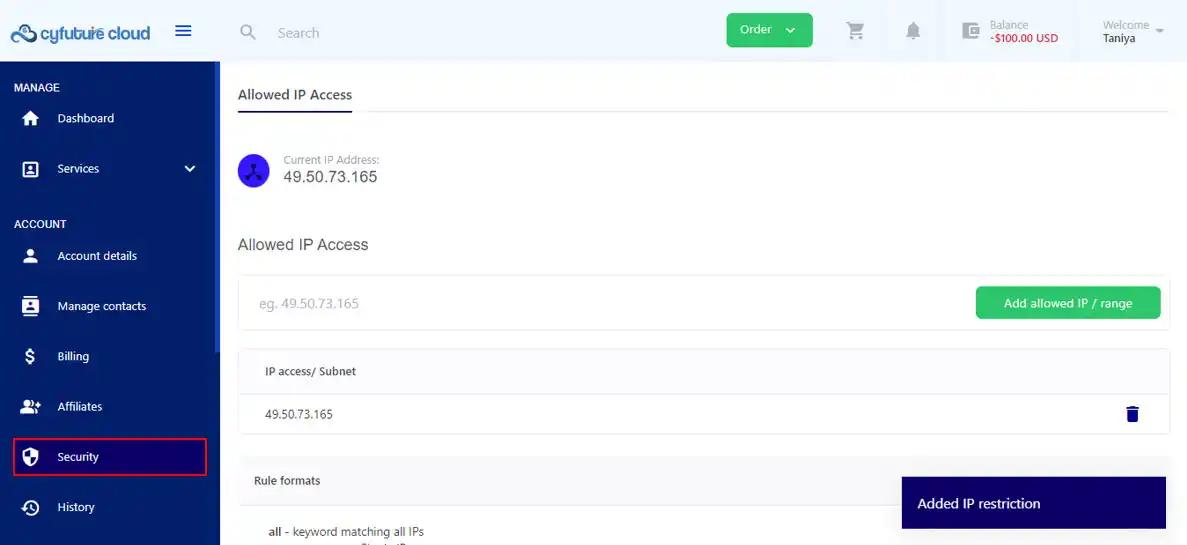
Through the Cyfuture Cloud portal, you can configure the security of the IP addresses you want. You can even set a range and add or remove IP restrictions as per your requirement basis. All you need to do is click on the “Security” tab on the Cyfuture Cloud portal and configure the security by adding IP addresses as per requirement.
Yes, you can configure Two-Factor Authentication services. This service is enabled by Cyfuture Cloud as default which helps in adding an additional layer of security against unauthorized access. In the 2FA section, you can configure:
You can configure the security of the IP addresses/ range, monitor the account activities on time, configure two-factor authentication, encrypt your Virtual Machines with a password or with SSH keys, and set custom rules in the firewall. These basic measures should be undertaken on a priority basis in order to avoid any kind of security lapses on your account.
Learn about technical and more.
In order to set up machines on the cloud, you need to follow the below given simple steps:
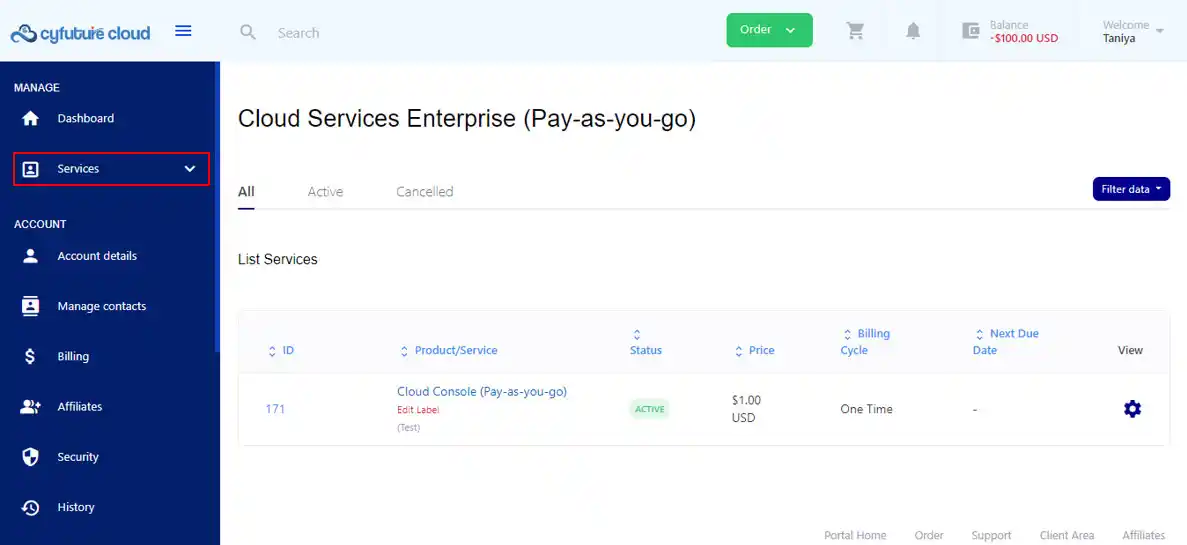
Step 1: Click on the “Services” tab and choose the active service through which you wish to set up the machine on Cloud.
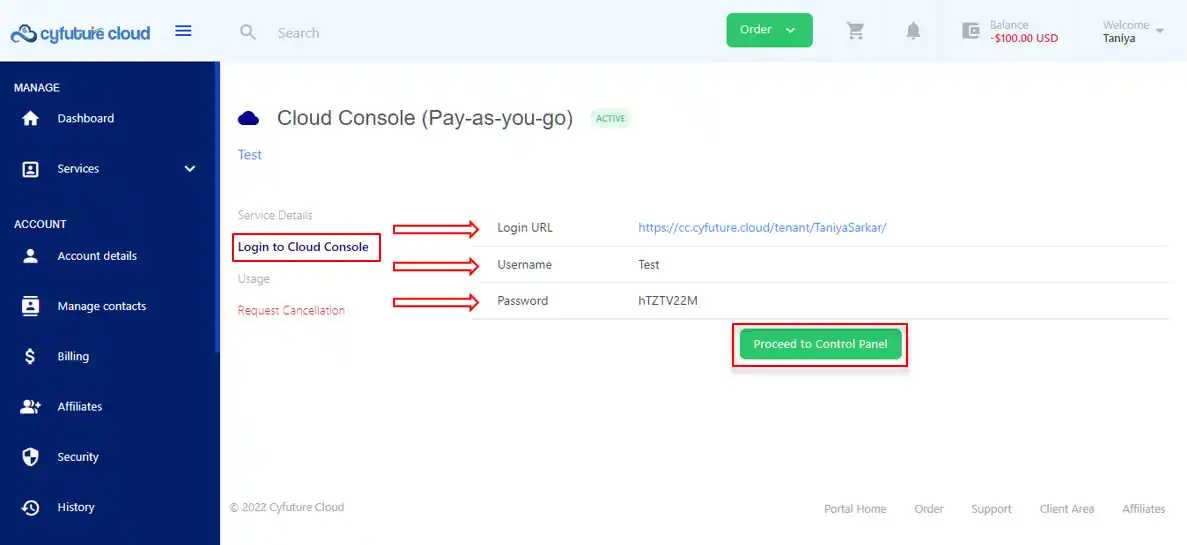
Step 2: Click on “Login To Console”. Here you will get the Login URL, username and password. Follow the URL to land on the control panel which is the main dashboard for creating VMs.
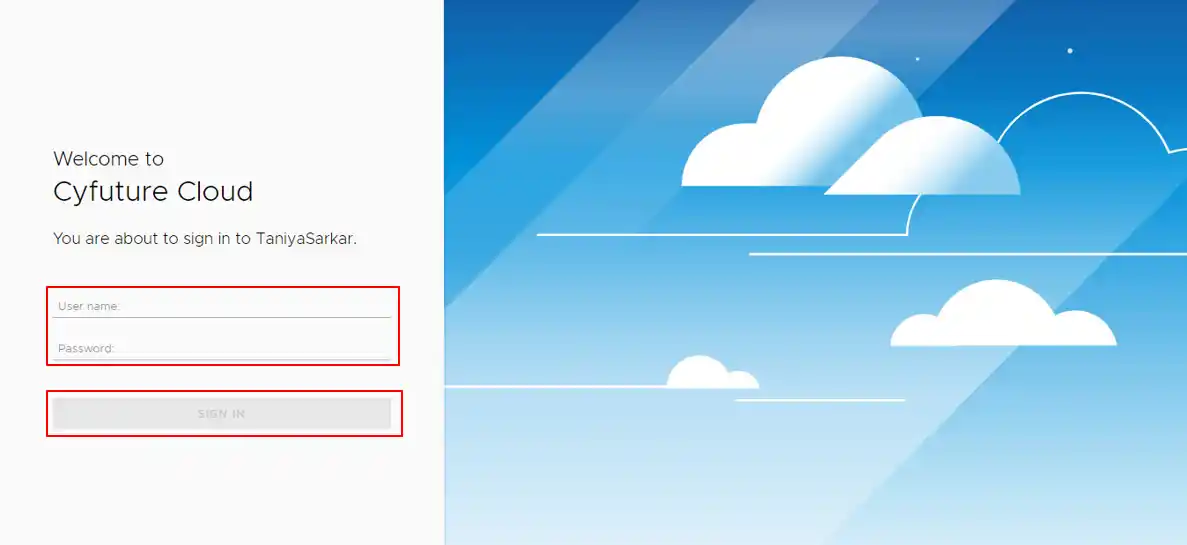
Step 3: Use the login credentials and hit the “Sign In” button to log in to your account.
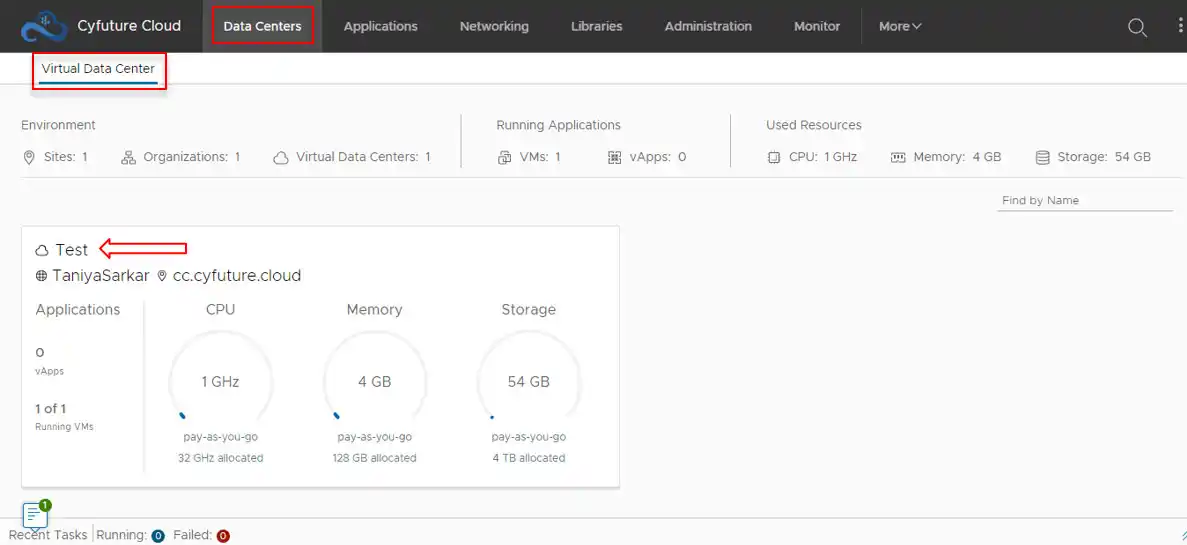
Step 4: The Virtual Data Center portal opens up. Here click on the Cloud Service that you need to use for creating the VM.
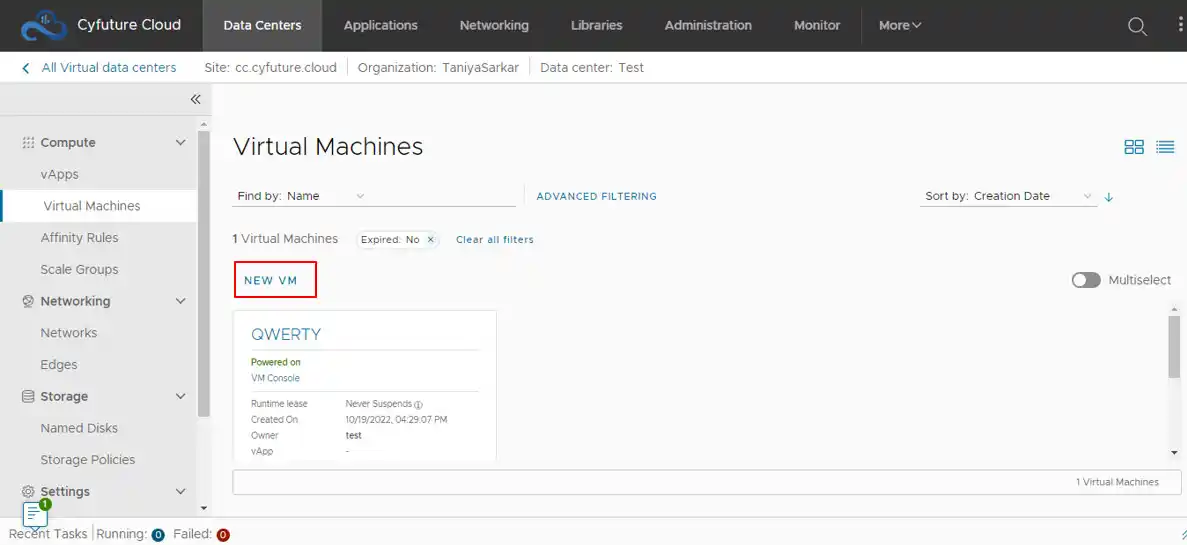
Step 5: The next window that opens up, click on the “New VM” button.
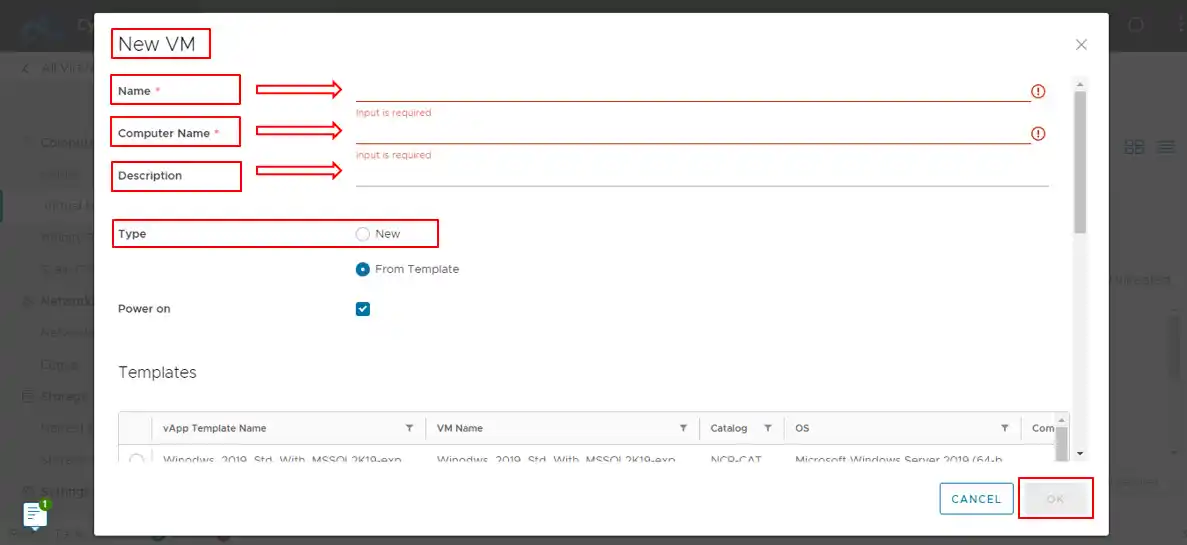
Step 6: The next window that opens up, click on the “New VM” button.
For more details, you can follow this link: https://manage.cyfuture.cloud/index.php?/knowledgebase/article/65/help-guide-operate-cyfuture-cloud-console-for-creating-virtual-machine-and-networks-/
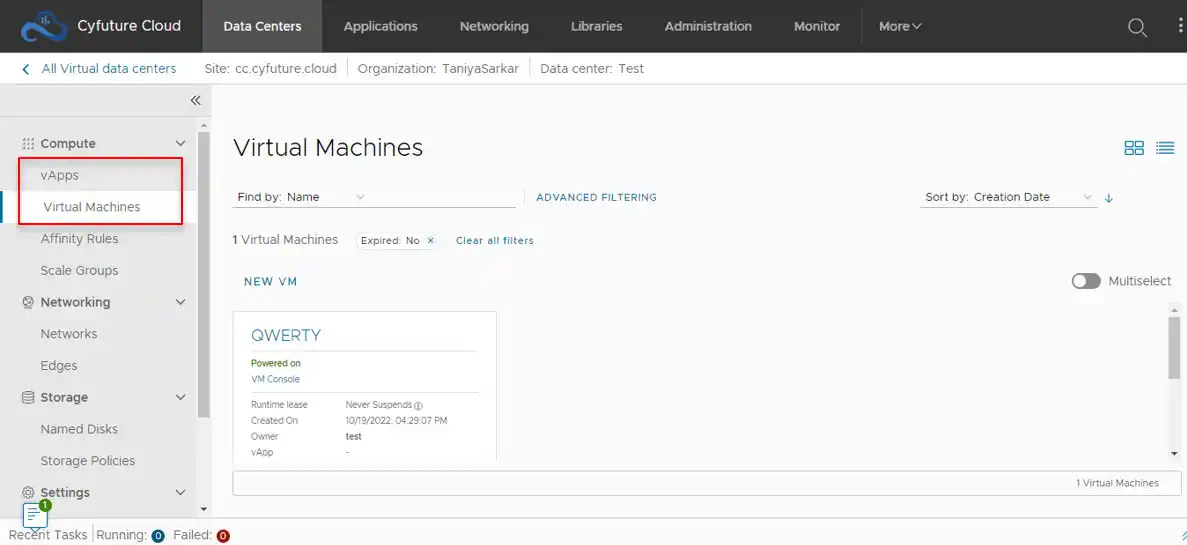
Using the Cyfuture Cloud portal, you can create VMs and vApps, set up networking, configure security, set affinity rules, and configure autoscaling on your own.
However, Cyfuture Cloud also offers managed services to help you configure your account. The same can be requested by raising a ticket through the support section of the Cyfuture Cloud Console portal.
Yes, Cyfuture Cloud offers auto-scaling features. In order to set up the same, you need to follow the below-given steps:
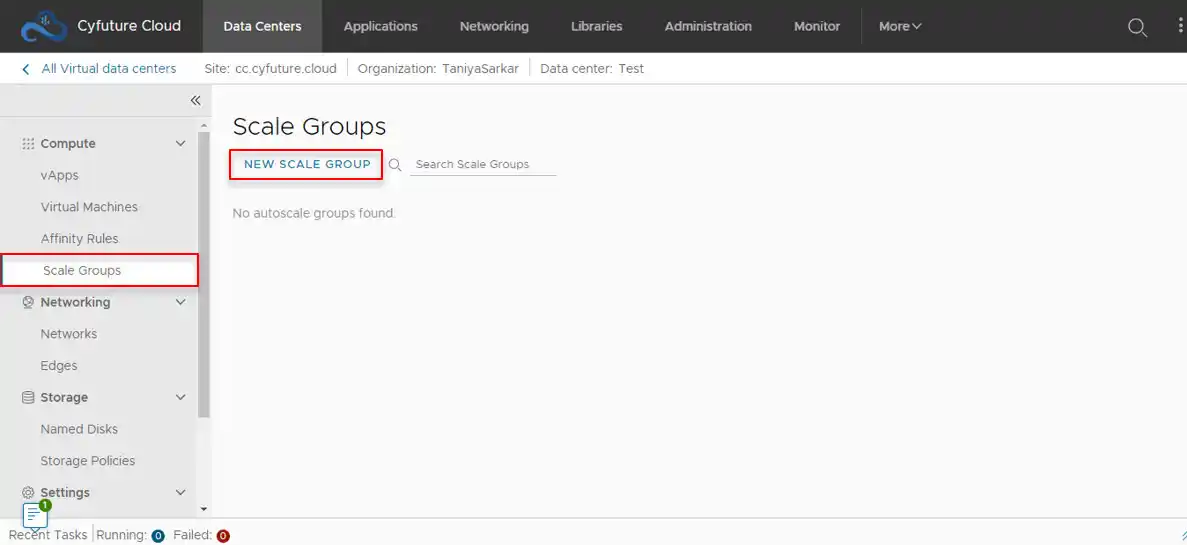
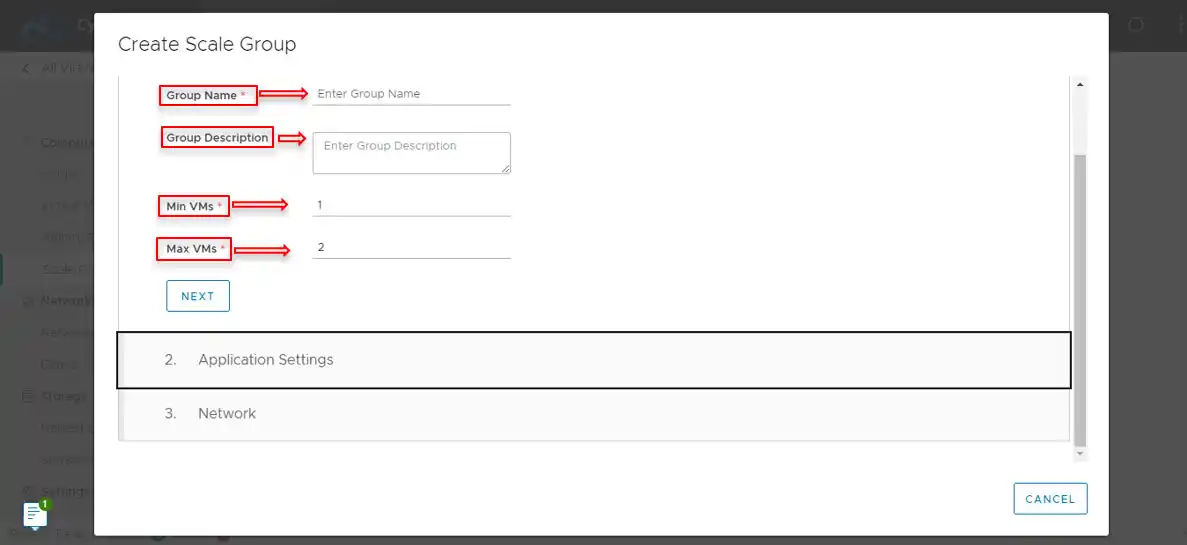
Step 1: Click on the “Scale Groups” tab under the “Compute” section of the console login panel. Further, click on the “New Scale Group” button to proceed.
Step 2: As soon as you click on the “New Scale Group” button, a form opens up. Here you can fill in the details as per your auto scaling requirements, including filling in the minimum and maximum number of VMs required.
Yes, Cyfuture Cloud offers container services. Each Cyfuture cloud account is created on a lightweight container with dedicated RAM and CPU. Our cloud-based portal helps to upload, organize, run, scale, and manage containers by using container-based virtualization.
In order to set up networking, you need to follow the below-given steps:
Step 1: Under the virtual machines’ menu, click on NICs.
Step 2: In the next window that opens up, you will find the Internal IP address reflecting on the table. Save the IP address for future reference.
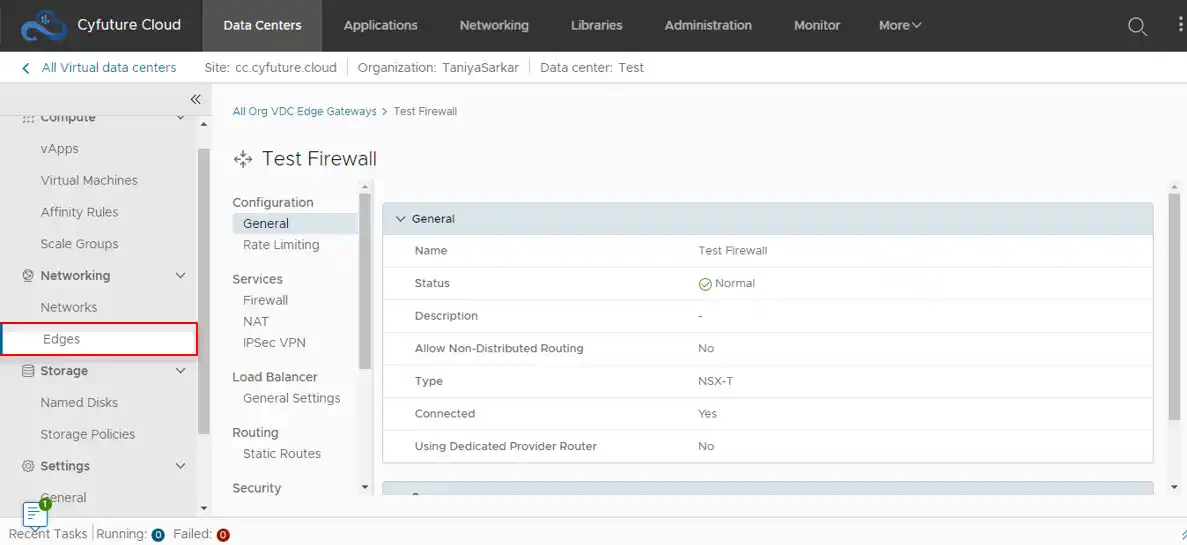
Step 3: Go back to the previous menu and click on “Edges”. In the window that opens up click on the link under the “Name” section for which you wish to set up the networking.
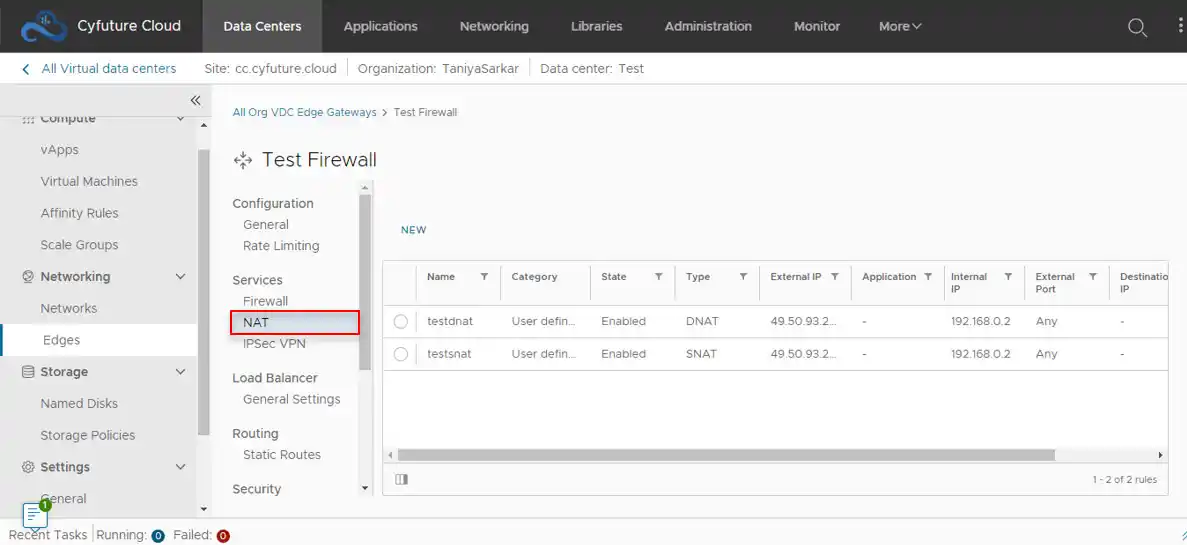
Step 4: In the next window, you will find a drop-down menu. Select “NAT” from the menu.
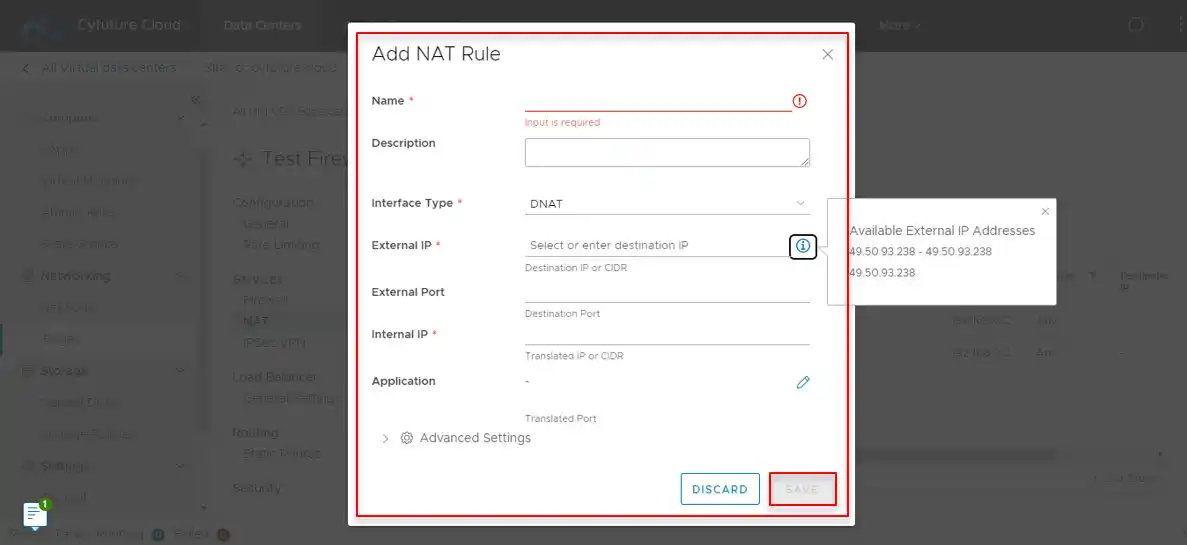
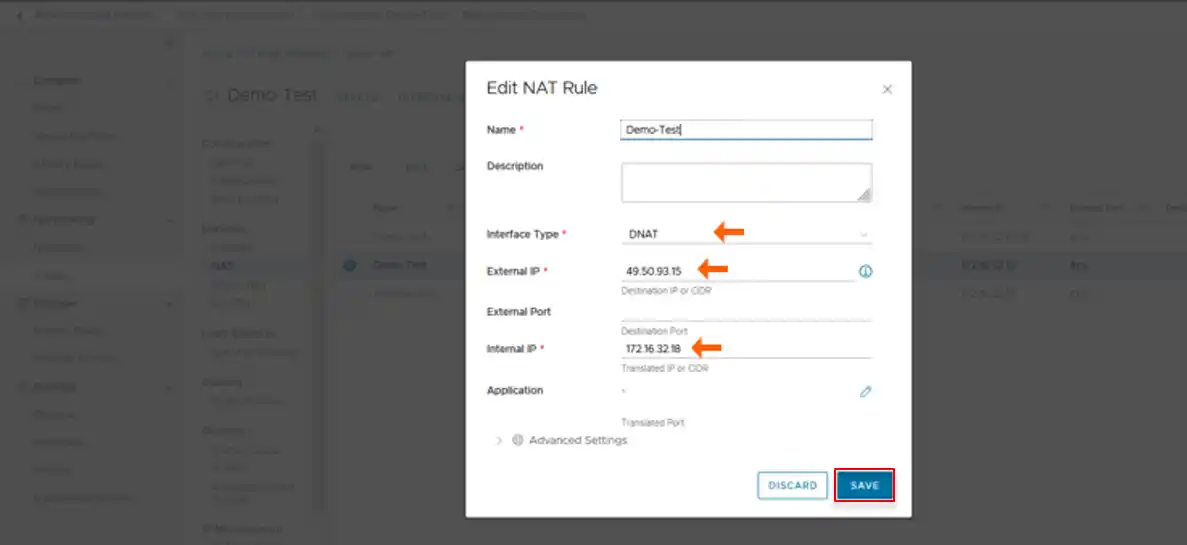
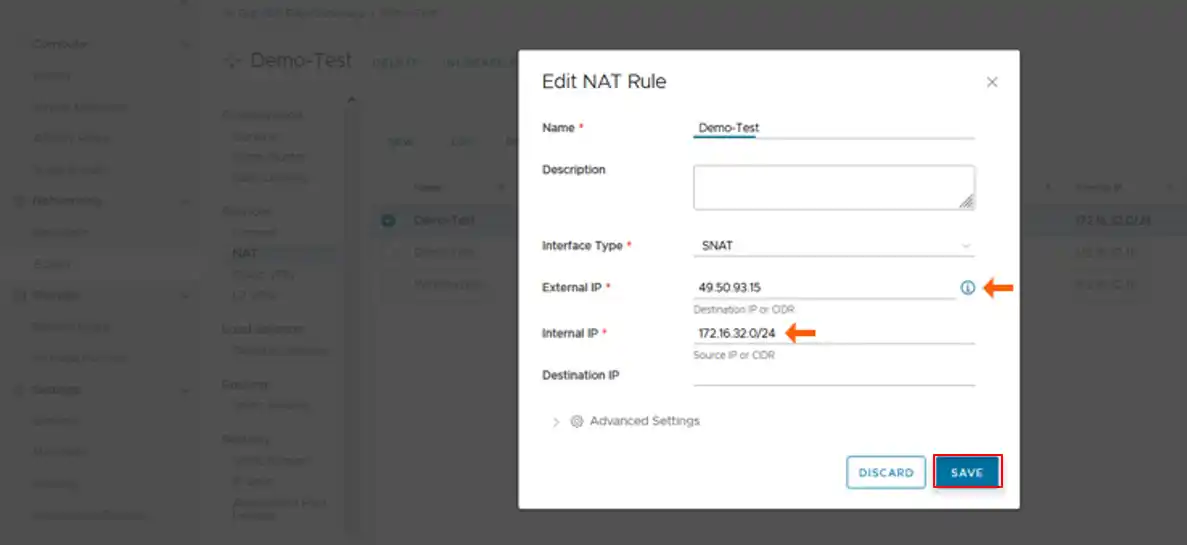
Step 5: In the window that will open up, click on “NEW” and then create SNAT and DNAT policy using the pop-up box that opens.
Step 6: Hover over the information symbol to view the external IP address. Fill in the form to add the NAT rule.
Step 7: Further create SNAT by filling in all the details and hitting the “Save” button. Similarly, create the DNAT as well by addressing all the details.
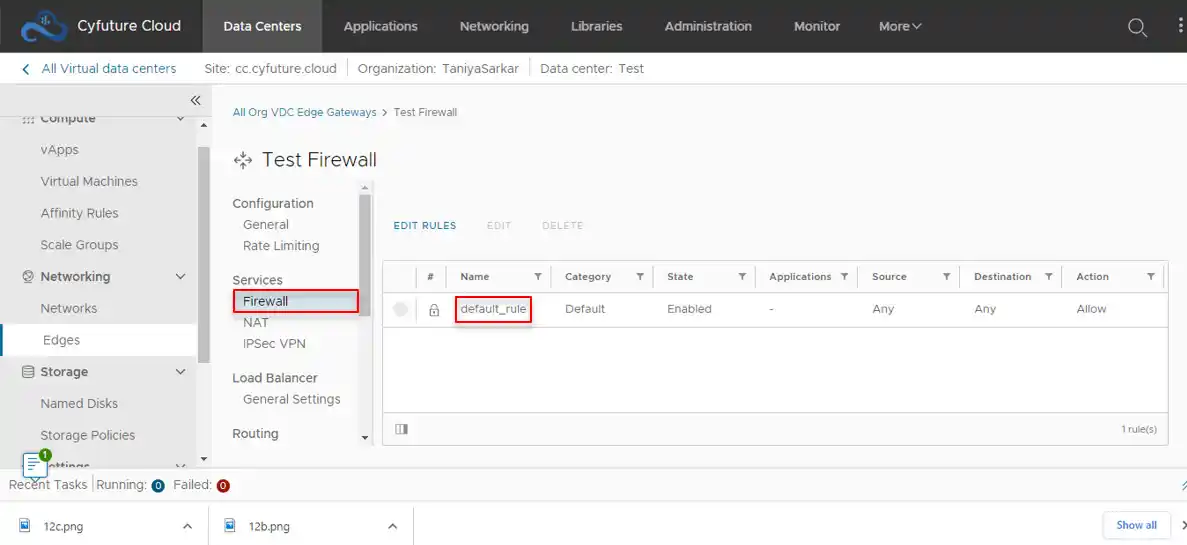
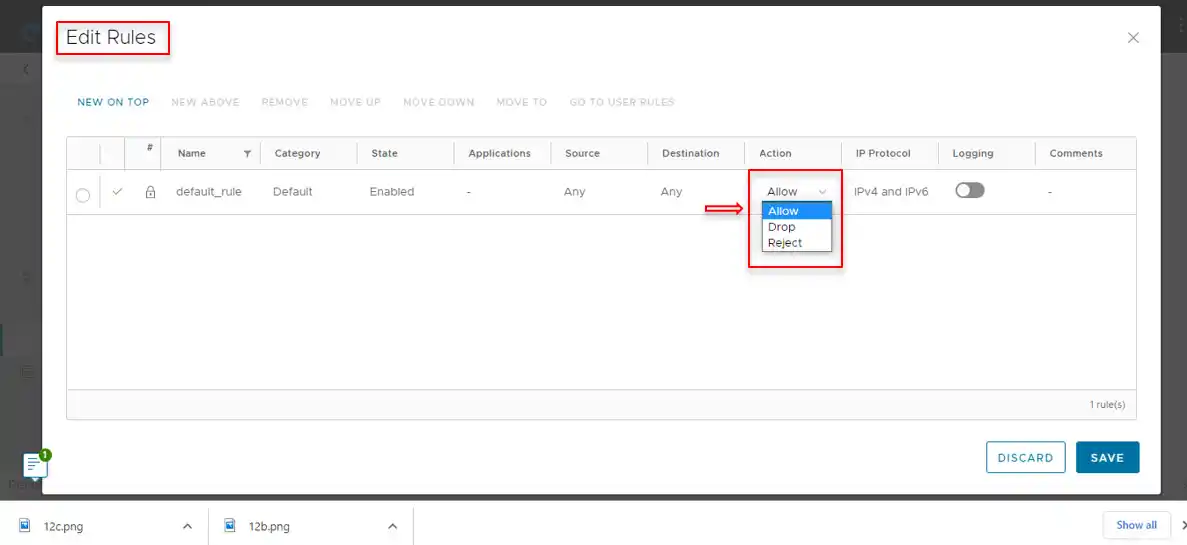
Step 8: After setting up SNAT and DNAT policies, click on the “Firewall” and select default_rule, and further click on “Edit Rules”
Step 9: Change the default value from the available drop-down and select it as “Allow”
A. Cyfuture Cloud is powered by highly robust Tier III certified datacenters located at multiple geographies in India for enhanced support and security. Here are the certifications:
- SAP Certified
- MeitY Empaneled
- HIPPA Compliant
- PCI DSS Compliant
- CMMI Level 5
- NSIC-CRISII SE 2B
- ISO 20000-1:2011
- Cyber Essential Plus Certified
- BS EN 15713:2009
- BS ISO 15489-1:2016
For more details, you can follow the link: https://cyfuture.cloud/about-company
Currently, there is no way to integrate and work as a multi-cloud platform through our cloud console. However, our developers are working on the same and this service will go live and the tenants will be able to integrate the same very soon.
Cyfuture Cloud provides extends its boundaries to PAN India locations. As far as the data centers are concerned, Cyfuture cloud has two data centers in Delhi NCR and one each in Jaipur and Raipur. All these four data centers are Tier III and MeitY empaneled.
The Cyfuture Cloud console can be used to create VMs and vApps. It is a self-supported console that allows you to manage the infrastructure and billing along with the configuration of the network and security.
Currently, the feature to choose different cloud regions from Cloud Console is not possible. However, our developers are working on it and this feature will go live very soon.
Clients can themselves take care of the backup of the data. All they have to do is visit the virtual data center portal and choose a backup of their data by clicking on “Data Protection with BAAS”.
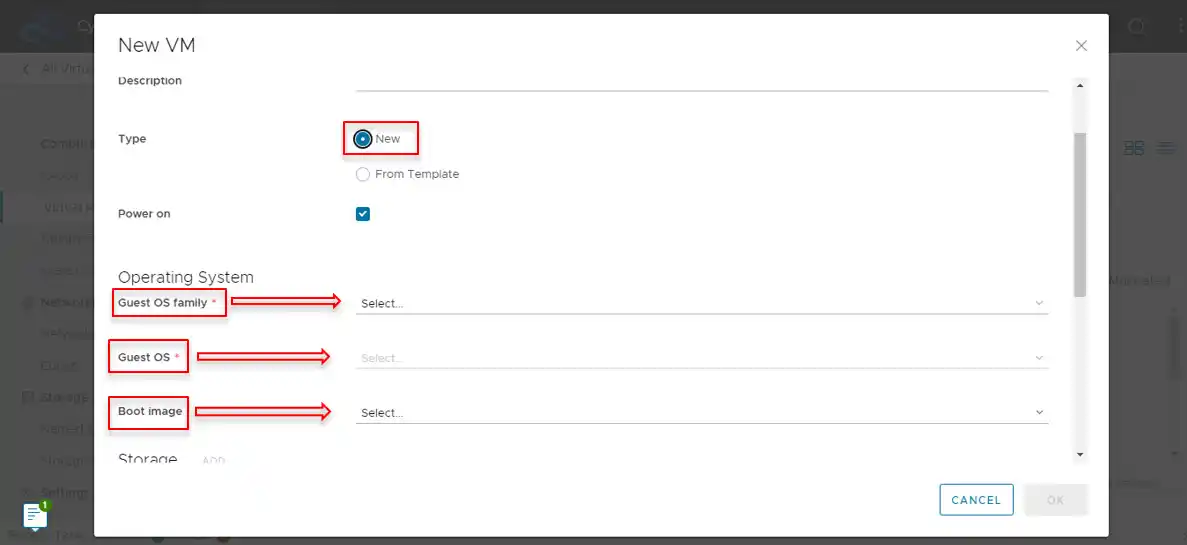
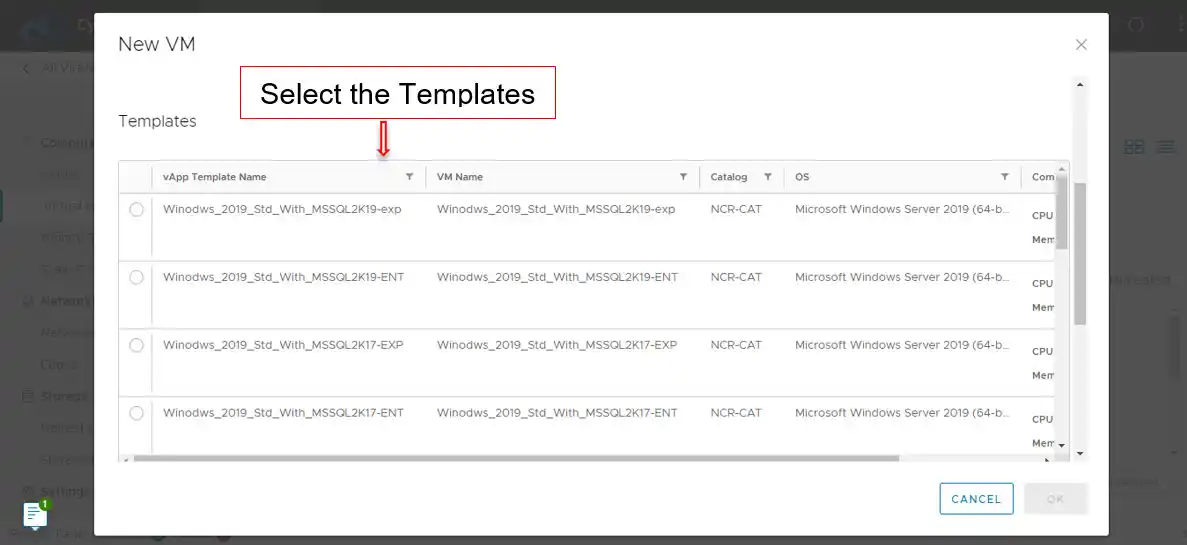
Yes, you have the option of creating your own templates. All you need to do is click on “New” rather than “From Template” to create a template of your choice. You will have to customize the new template by selecting the Guest OS family, Guest OS, and Boot Image.
Apart from this, Cyfuture Cloud offers around 30 templates to choose from. The same can be selected from the Templates tab or can be viewed from the “Libraries” tab.
