 Server
Colocation
Server
Colocation
 CDN
Network
CDN
Network
 Linux Cloud
Hosting
VMware Public
Cloud
Multi-Cloud
Hosting
Cloud
Server Hosting
Linux Cloud
Hosting
VMware Public
Cloud
Multi-Cloud
Hosting
Cloud
Server Hosting
 Kubernetes
 API Gateway

The demand for powerful computing in deep learning has skyrocketed in recent years. According to a 2023 report by Statista, the global deep learning market is projected to reach a staggering $88.9 billion by 2026, growing at a compound annual growth rate (CAGR) of 38.5%. This rapid growth underscores the importance of advanced hardware solutions, and one of the key players in this field is NVIDIA’s A100 GPU. Known for its remarkable performance in AI, machine learning, and deep learning workloads, the A100 is a game-changer for researchers, data scientists, and businesses working on complex AI models.
Setting up the NVIDIA A100 GPU is no longer just a task for large tech companies; with the evolution of server, hosting, and cloud infrastructure, it’s now accessible to various enterprises and research institutions. In this blog, we’ll walk you through the entire process of installing and setting up the A100 GPU for deep learning, from hardware configuration to the necessary software setups.
Before diving into the installation process, the first thing you need to determine is where you plan to deploy the A100 GPU. The A100 is a high-performance piece of hardware, and ensuring it operates in the right environment is critical. Let’s break down your options:
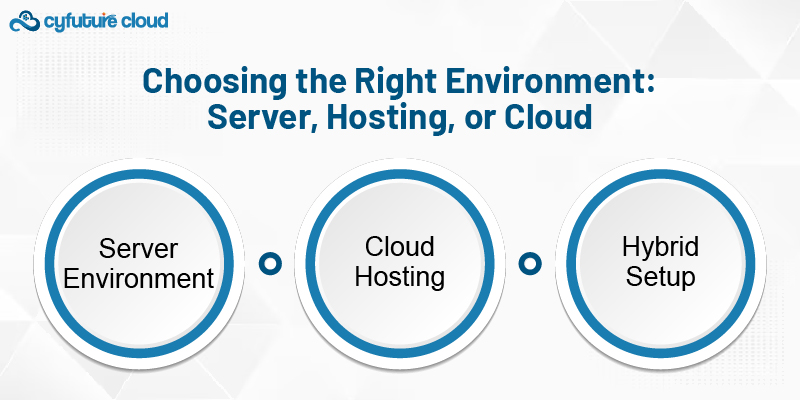
Server Environment: For organizations with a dedicated infrastructure, setting up an on-premise server with the A100 GPU provides full control over your hardware and deep learning operations. This method, while offering flexibility, requires adequate space, cooling, and power requirements.
Cloud Hosting: If you prefer not to manage physical hardware, cloud hosting platforms like AWS, Google Cloud, and Microsoft Azure offer access to A100 GPU instances. Cloud hosting allows for scalable solutions, making it ideal for fluctuating workloads and projects with unpredictable demands.
Hybrid Setup: Some businesses choose a hybrid cloud solution where they combine both on-premise servers and cloud hosting. This method provides a balance between performance and flexibility.
Once you’ve settled on the environment for your setup, it’s time to install the A100 GPU. Here's how you can proceed:
If you’re working in a server environment, the physical installation of the A100 is straightforward but requires some care. Follow these steps:
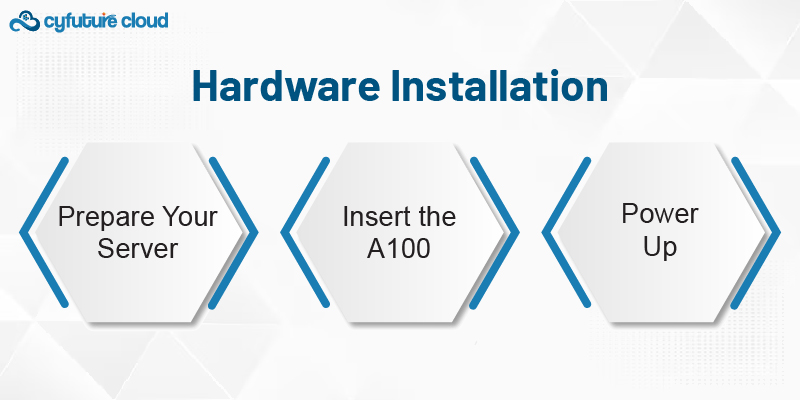
Prepare Your Server: Make sure your server has the necessary PCIe slots to fit the A100. It’s also essential to check that your system can provide the required power, typically around 300 watts per GPU.
Insert the A100: Insert the GPU into the PCIe slot and secure it in place. Ensure that the power connectors are plugged in properly.
Power Up: After ensuring everything is securely connected, power up your system.
Once your GPU is physically installed, the next step is setting up the software environment.
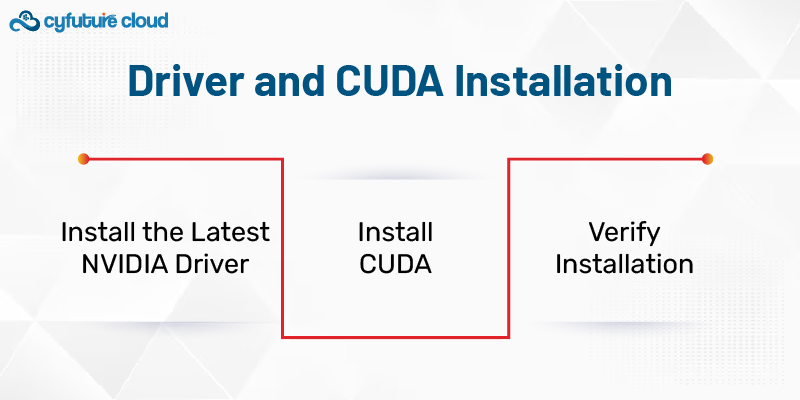
Install the Latest NVIDIA Driver: The A100 relies on specific drivers for optimal performance. You can download the latest drivers directly from NVIDIA’s website. Follow the installation prompts to get the necessary drivers on your system.
Install CUDA: CUDA is a parallel computing platform and application programming interface model created by NVIDIA. It’s necessary for GPU acceleration. The version of CUDA you install depends on the deep learning framework you plan to use (e.g., TensorFlow, PyTorch). Make sure you install the compatible version to avoid compatibility issues.
Verify Installation: After installation, run nvidia-smi in the terminal to check if the GPU is correctly detected and functioning.
Now that the hardware and drivers are in place, it’s time to set up the deep learning frameworks. You’ll likely want to install popular libraries like TensorFlow or PyTorch, depending on your project requirements.
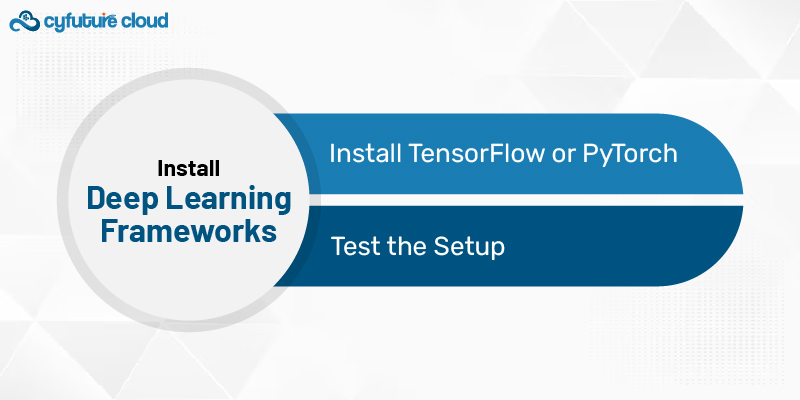
Install TensorFlow or PyTorch: Both frameworks have specific versions optimized for use with the A100. You can install them using pip or conda commands. Be sure to install the GPU-compatible versions to ensure that your models are accelerated effectively.
For TensorFlow, for example:
pip install tensorflow-gpu
For PyTorch:
pip install torch torchvision torchaudio
Test the Setup: Run a simple model or script to verify that everything is working. For instance, you can use a sample model from the TensorFlow or PyTorch documentation to check GPU utilization.
Setting up the NVIDIA A100 GPU for deep learning may seem like a daunting task at first, but by following the steps outlined above, you can successfully install and optimize the hardware for your research or business applications. Whether you opt for a server-based solution, cloud hosting, or a hybrid setup, the A100 provides unparalleled performance, making it a solid choice for anyone serious about deep learning.
In a world where server, hosting, and cloud solutions are constantly evolving, the A100 gives you the ability to leverage high-performance AI capabilities, giving you a competitive edge. With the right hardware setup, software configuration, and framework installations, your deep learning models will be able to operate at full throttle, helping you push the boundaries of what’s possible in artificial intelligence.
By staying up-to-date with the latest advancements in GPU cloud technology and setting up your system correctly, you ensure that your deep learning journey will be smooth and efficient.

Let’s talk about the future, and make it happen!

 Pricing
Calculator
Pricing
Calculator
 Power
Power
 Utilities
 VMware
Private Cloud
VMware
Private Cloud VMware on
AWS
VMware on
AWS VMware on
Azure
VMware on
Azure Service
Level Agreement
Service
Level Agreement 