 Server
Colocation
Server
Colocation
 CDN
Network
CDN
Network
 Linux Cloud
Hosting
VMware Public
Cloud
Multi-Cloud
Hosting
Cloud
Server Hosting
Linux Cloud
Hosting
VMware Public
Cloud
Multi-Cloud
Hosting
Cloud
Server Hosting
 Kubernetes
 API Gateway

Building your own web hosting server can be a rewarding experience; it gives you full control over your website’s infrastructure, security, and performance. Whether you’re setting up a personal hosting environment, launching a small business hosting service, or experimenting with server administration, understanding the fundamentals of server web hosting is essential.
This guide walks you through everything you need to know to build a web server hosting environment from scratch, including hardware, software, networking, and configuration.
Follow these steps to set up your own server for web hosting:
A web hosting server stores website files (HTML, CSS, images, databases, etc.) and delivers them to visitors’ browsers over the internet.
When someone types your domain name, the DNS directs that request to your web server hosting setup, which then retrieves and serves the requested web page.
Core functions include:
◾ Storing and managing website data
◾ Handling HTTP/HTTPS requests
◾ Managing domains and DNS records
◾ Running server-side scripts (like PHP, Node.js, or Python)
◾ Providing FTP/SFTP access for file uploads
To build a server web hosting environment, you need reliable hardware that can handle 24/7 uptime.
Minimum recommended specifications:
If you’re hosting multiple websites or expect high traffic, consider dedicated server-grade hardware instead of consumer PCs.
One of the major differences is whether you want to pay for a Windows license or save money by using Linux which is a free, open-source program. Linux servers are also much more customizable. Let’s take a moment to compare the two.
Linux is used by 96.3% of the top one million servers, according to ZDNet. This is because it’s free and easy to use and customize. Linux servers are also more secure with far fewer malware opportunities for hackers to exploit.
However, they aren’t invincible. You still need to keep your software updated and everything properly configured.
There are also some programs that Linux won’t work with but the majority of Windows programs will run on it through a program called WineHQ.
To create a server at home using Windows, you’ll need to purchase a license. This guarantees you’ll receive long-term support for any issues you encounter.
You can also conveniently fix any technical issues through a system recovery. Other benefits include automatic system updates, support of numerous apps, and the fact that it’s beginner-friendly.
However, it has its disadvantages like being more expensive and more vulnerable to malware.
Most people will opt for Windows server operating systems at home. This is because Windows is a system that most people are familiar with. Therefore most of what’s discussed in this article will be for Windows servers.
The one exception is where we discussed the difference between Windows and Linux servers. The remainder of this article will tell you how to set up a Windows home server.
Choose your web server software this is what actually serves the website files to users.
Popular web server hosting software options include:
◾ Apache HTTP Server – Most common and beginner-friendly
◾ NGINX – Lightweight and faster for high-traffic sites
◾ LiteSpeed – Optimized for performance and caching
◾ IIS (Internet Information Services) – For Windows-based servers
Example (Linux - Apache setup):
Once installed, visit your server’s IP in a browser if the Apache default page loads, your web server is live.
Most modern websites rely on databases and dynamic scripts. Install software like:
◾ MySQL or MariaDB – Database management system
◾ PHP, Python, or Node.js – For dynamic content generation
For example, to install PHP with Apache on Ubuntu:
To make your server web hosting accessible globally, configure a domain name:
1. Register a domain (e.g., via GoDaddy, Namecheap).
2. Point your A Record to your server’s public IP address.
3. Use a DNS manager to handle subdomains, MX records, and email setup.
Once DNS propagates, visiting your domain will load your hosted website.
Security is critical in web server hosting environments. Implement the following:
◾ Install SSL/TLS Certificates using Let’s Encrypt.
◾ Enable firewall protection (UFW or iptables).
◾ Regularly update OS and software packages.
◾ Set up fail2ban or similar intrusion prevention tools.◾ Use strong passwords and limit SSH access.
- FTP/SFTP access
- Email accounts
- Databases
- DNS zones
- Software/app dependencies
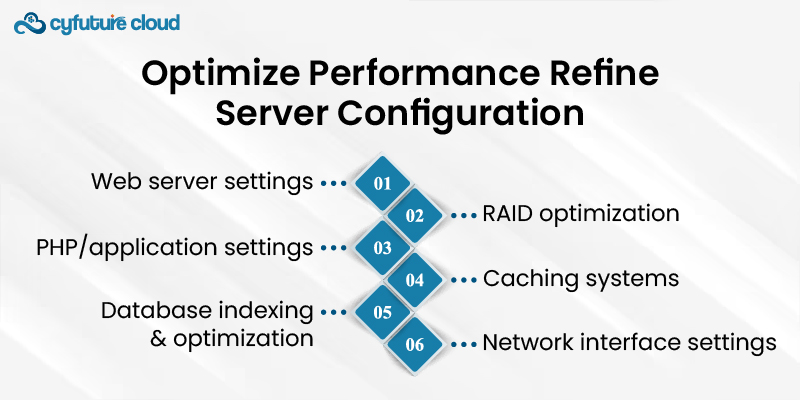
- Web server settings
- Database indexing and optimization
- PHP/application settings
- Caching systems
- RAID optimization
- Network interface settings
Implement backup routines for websites and databases. Enable off-site replication or connect object storage.
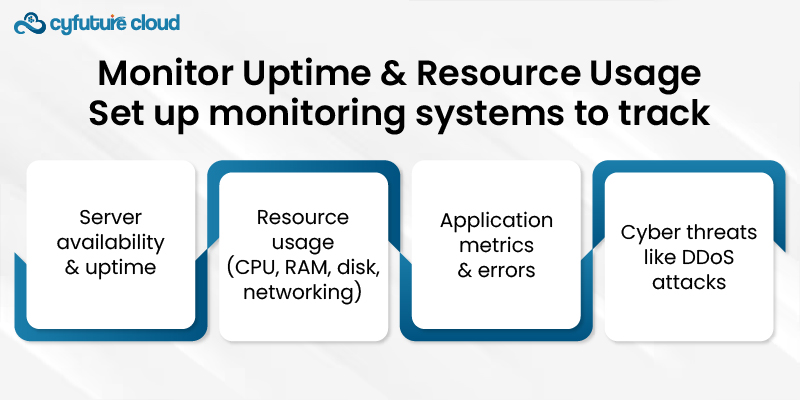
- Server availability and uptime
- Resource usage (CPU, RAM, disk, networking)
- Application metrics and errors
- Cyber threats like DDoS attacks
Now you're ready to deploy websites and get your cloud hosting business online! Let me know if you have any other questions.
Building your own web hosting server gives you complete control, customization, and scalability. Whether for personal projects, enterprise-level applications, or launching your own hosting service mastering web server hosting opens the door to long-term performance optimization and cost savings.
For businesses or developers who prefer managed solutions, platforms like Cyfuture Cloud offer enterprise-grade server web hosting services with automated scaling, 24/7 support, and advanced security eliminating the complexities of manual setup.

Let’s talk about the future, and make it happen!

 Pricing
Calculator
Pricing
Calculator
 Power
Power
 Utilities
 VMware
Private Cloud
VMware
Private Cloud VMware on
AWS
VMware on
AWS VMware on
Azure
VMware on
Azure Service
Level Agreement
Service
Level Agreement 