 Server
Colocation
Server
Colocation
 CDN
Network
CDN
Network
 Linux Cloud
Hosting
VMware Public
Cloud
Multi-Cloud
Hosting
Cloud
Server Hosting
Linux Cloud
Hosting
VMware Public
Cloud
Multi-Cloud
Hosting
Cloud
Server Hosting
 Kubernetes
 API Gateway

In the age of rapid communication, keeping several email accounts may be both necessary and inconvenient. If you're transferring between your personal Gmail account and a webmail account for work or company, the process might be time-consuming and wasteful.
But what if you could speed up this procedure by consolidating all of your emails?
This is when customizing your webmail in Gmail comes in handy, changing your email management into a smooth and unified experience.
While managing multiple email accounts is expedient for compartmentalizing work and personal communication, toggling between platforms can disrupt productivity. Gmail streamlines this process through webmail configuration, allowing access directly from the familiar Gmail interface.
No more toggling or tedious logins - all accounts are accessed with just a few clicks. This boon is appealing to a variety of professionals seeking to boost efficiency. Solopreneurs and small business owners will find special benefit in consolidating inboxes to better organize correspondences and reduce distraction.
Whether your role demands agility in responding to time-sensitive queries from clients or collaborators rely on your ready availability, automating interchanging between accounts delivers simplification where previously only complication reigned. Streamlining email management elevates output by removing an obstacle to fluid workflows.
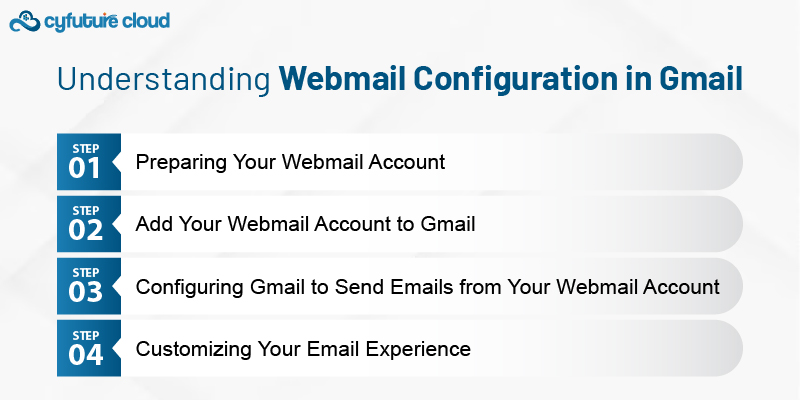
Before delving into the specific procedures, it is imperative to fully comprehend what precisely webmail configuration in Gmail involves. Fundamentally, it permits one to append a webmail account (such as those furnished by your web hosting service provider) to your existing Gmail account. This implies you can both deliver and obtain emails from your webmail account while taking advantage of Gmail's interface. The configuration necessitates two primary phases: incorporating your webmail account into Gmail and establishing the capability to transmit emails from this account within Gmail. Furthermore, the process demands judiciously adjusting settings to harmonize the intricate webmail account with the overarching Gmail framework, culminating in a cohesive experience for both sending and receiving correspondence.
When connecting your webmail with Gmail, make sure you have all of the essential data. It might include your email address, password, POP3 or IMAP server configuration, and SMTP settings.
These are crucial for the setup process. In addition, these data are typically provided by your cloud web hosting service.
- Log into your Gmail account. Then go to Settings by clicking the gear icon in the upper-right corner. Further, select 'See all settings'.
- Navigate to the Accounts. Import the tab and find the section labeled 'Check mail from other accounts'.
- Now, click on 'Add a mail account.’ It will ask you to enter the email address of the account you wish to add.
- Enter your webmail address and proceed to the next step. You will be asked to fill in the details for your webmail account, including the POP3 or IMAP server and port settings.
- Choose whether to leave a copy of retrieved messages on the server and other options according to your preference. This step is crucial if you're using the account on multiple devices or platforms.
- Complete the setup by clicking 'Add Account'. Google will then verify your details and, if successful, add your webmail account to Gmail.
- In the same 'Accounts and Import' tab, locate the 'Send mail as' section and click on 'Add another email address'.
- Enter your name and the webmail address you wish to send emails from. This name will appear as the sender in emails you send.
- Fill in the SMTP server details for your webmail account, including the server address, port, username (your full webmail address), and password.
- Decide on the security protocol (SSL or TLS) based on your SMTP settings and complete the authentication process.
- Verify the email address by clicking on the verification link sent to your webmail account. This step is necessary to confirm that you own the email address.
After successfully adding and verifying your webmail account, you can customize how you use it within Gmail. This includes setting the default email address for sending messages, replying from the same address the email was sent to, and organizing emails through labels and filters.
While the process is generally straightforward, you might encounter issues such as incorrect server settings or authentication problems. Double-checking your webmail account details and ensuring you've entered the correct server information can often resolve these issues. If problems persist, consulting your web hosting service's support team can provide additional guidance.
While consolidating webmail into Gmail streamlines correspondence, fully exploiting Gmail's sophisticated capacities upgrades communication. Though synchronizing demands supplying webmail credentials carefully, fruitful configuration means capitalizing on Gmail's proficiencies to centralized yet nuancedly organized electronic messages. Staying abreast necessitates disciplined navigation amidst a flood of asynchronous updates; concentrating productivity involves deft sorting and selective alerting. Once configured, the cross-platform interchange empowers diligent responsiveness anywhere, anytime through a single portal. efficacy and expediency result from strategically leveraging accumulation and algorithmic recommendation within a capably designed interface.

Let’s talk about the future, and make it happen!

 Pricing
Calculator
Pricing
Calculator
 Power
Power
 Utilities
 VMware
Private Cloud
VMware
Private Cloud VMware on
AWS
VMware on
AWS VMware on
Azure
VMware on
Azure Service
Level Agreement
Service
Level Agreement 