Server
Colocation
Server
Colocation
 CDN
Network
CDN
Network
 Linux Cloud
Hosting
VMware Public
Cloud
Multi-Cloud
Hosting
Cloud
Server Hosting
Linux Cloud
Hosting
VMware Public
Cloud
Multi-Cloud
Hosting
Cloud
Server Hosting
 Kubernetes
 API Gateway
With reference to the well-known email clients and personal information managers, one of those included in the Microsoft Office software is the Microsoft Outlook. Now, you can handle your calendar, contacts, list of tasks and notes in a uniform tool as well as communicate with people using your email account. The first step is to buy a VPN subscription that works in the needed country.
A Windows PC with internet access
A valid email account you want to connect Outlook to
I recommend you to visit the web page in order to make sure that Outlook is installed on your computer. This program is written to work with your Windows 10 computer. If you don't already have the app, you can download it for free from the Microsoft website and install it on your PC.
The understanding of how an Outlook 2013 can be used to set up Windows emails will be an easy process for the readers, so the instructions given in this article can help prove this perception. Although the steps are written for Outlook 2013, the overall procedure works with older versions of Outlook as well. There may be minor differences in certain steps or screens between versions, but the overall configuration method will be similar.
Adding A New Account
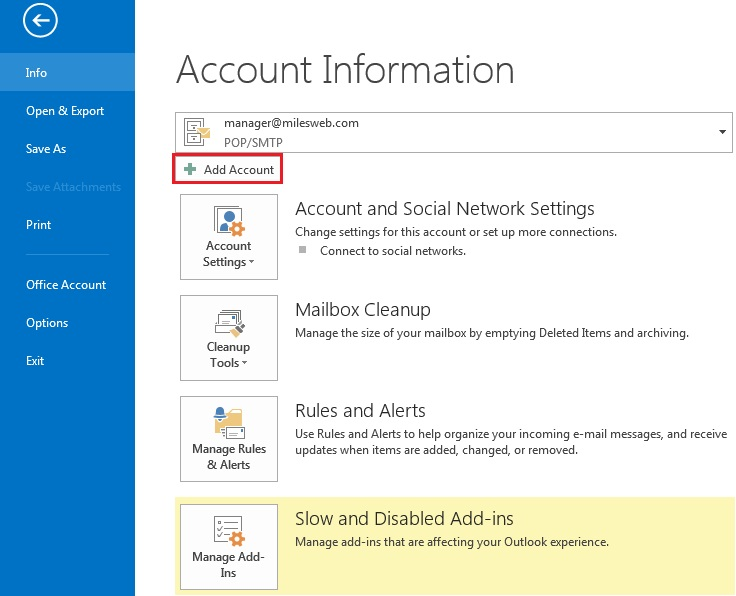
Select the ‘File’ menu
Select ‘Info’
Click on ‘Add Function’ button
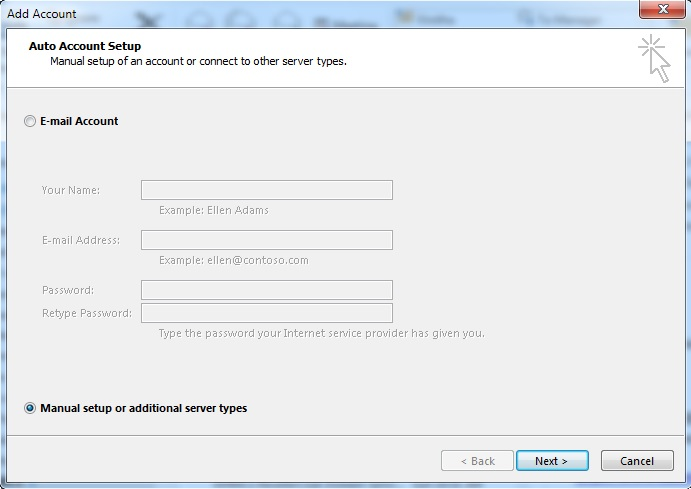
Select ‘Manually setup or additional server types’
Click on Next
Select ‘POP or IMAP’
Click on Next
Configuring Account Settings
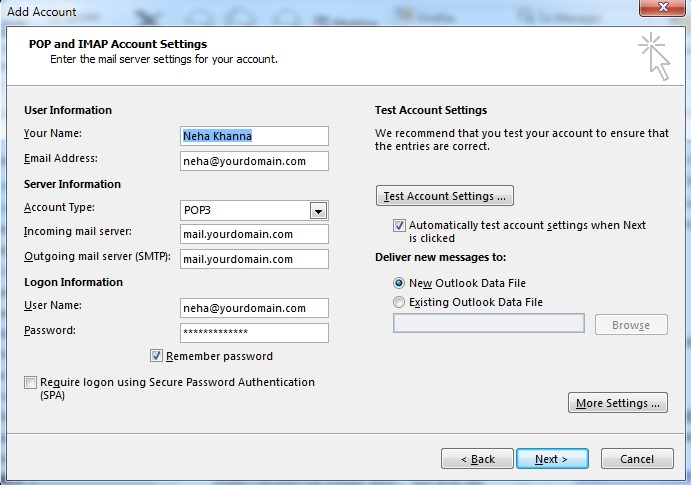
When prompted, enter your full name that you want to be displayed on emails you send from this account.
Enter your complete email address
For the User Name field, input your complete email address.
Enter your email password
Mail is your mail server.YouDomain.com Your domain name is YourDomain.com.
Usually, your outgoing mail server and incoming mail server address match.
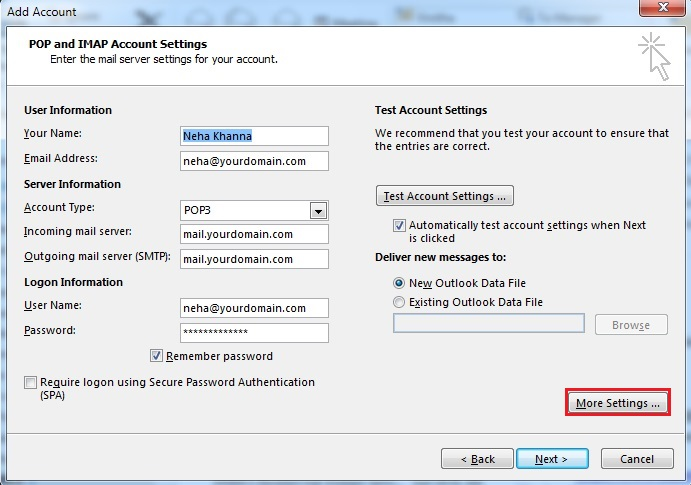
More Settings
Click on the ‘More Settings’ button
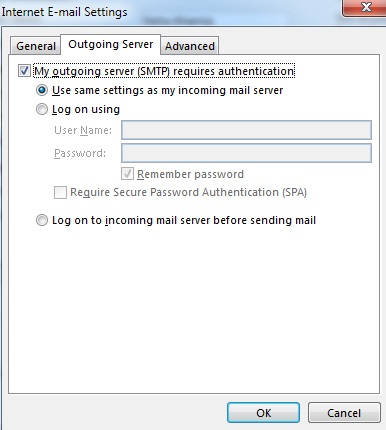
Click on ‘Outgoing Server’ ta
Check the box that says ‘My outgoing server (SMTP) requires authentication’
Select the option 'Use same settings as my incoming mail server'.
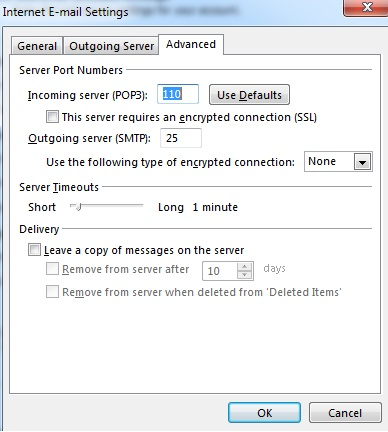
Click on the ‘Advanced’ tab
If using POP3 with SSL encryption, check the box to enable SSL and change the port to 995. Otherwise, leave the default POP3 port as 110.
For POP3 accounts, you can choose when messages are removed from the server - either when deleted from the inbox or immediately on download.
If using IMAP with SSL, enable the SSL checkbox and set the port to 993. For non-SSL IMAP, leave the default port as 143.
For SMTP with SSL, enable SSL and set the port to 465. For non-SSL SMTP, use port 25.
Now click on the ‘OK’ button
Testing Settings
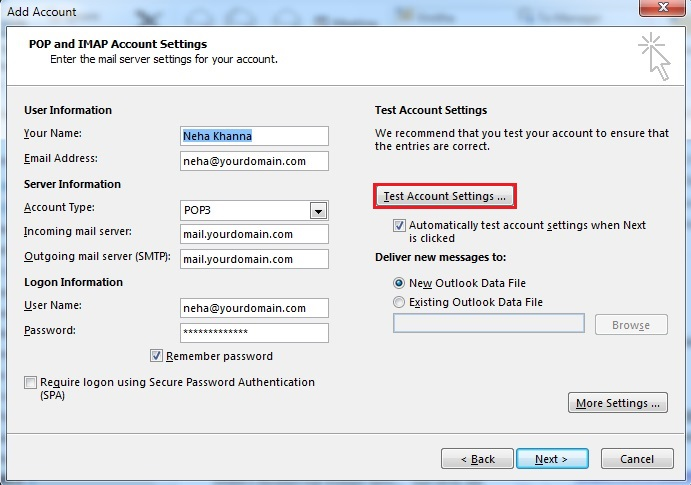
While on the email accounts configuration screen, click "Test Account Settings" to validate your settings.
This will send a test email to yourself to confirm everything is working properly. If any errors are received, double check your configurations.
Once the test is complete, click "Close" on the Test Account Settings window.
Click ‘Next’ on email accounts window
Click on the ‘Finish’ button
Just click the account name in the upper right corner to move between accounts.
Navigate to File > Options > Mail and set up signatures in the Compose Messages section to add email signatures.
To improve security, go to File > Options > Trust Center and adjust junk email filter and encryption settings.
Use Outlook's Search function to quickly find emails, contacts, calendar events etc.
Customize the Navigation Pane to add shortcuts for frequently accessed folders and features.
That covers the basics of setting up Microsoft Outlook on your Windows PC! With your email accounts configured, you can now enjoy the many features and productivity tools Outlook offers to manage all your important information in one place.
Following these steps will make setting up a Microsoft Outlook email account on your Windows computer simple
After the programme Outlook opens, you have to "File" in the upper left part of the window.
Proceed with "Add Account" option. It would be necessary to enter your password and email address.
Outlook will make an effort to find the server settings on its own. If it doesn't, just manually input them.
Finally, click "Finish" to complete the account setup.
To further optimize your Outlook email experience, consider these tips:
For better security, the two-factor authentication should be employed, which means that beside the entering the password, you have to proof it by entering the verification code.
Set up email filters to automatically apply criteria for classification of an incoming email by type (sender, subject, etc.) and then move them to labeled folders.
In order no to keep on receiving irrelevant lerts, it is recommended to customize notifications in such a way that new emails will be sent at the desired frequency.
Explore advanced features like shared calendars, task management, and integration with other Microsoft apps.
Following these suggestions when first setting up your Outlook account, and customizing based on your specific needs, will allow you to get the most benefit from this powerful email management application.
Verify compatibility: Ascertain whether your system is capable of supporting the installation of Microsoft Outlook. Before starting the installation, make sure the OS version, storage capacity, and other requirements are met.
Turn off your antivirus: Some programmes have the ability to halt the installation process. Disable any third-party antivirus software temporarily on your PC to prevent conflicts with the installation process. Remember to switch them back on afterwards.
Run as admin: Choose "Run as administrator" by doing a right-click on the Microsoft Outlook installation. By doing this, you may make sure you have permissions to install apps on your computer and address authorization issues.
Empty temporary files: Repairing faulty or incomplete installs on your computer may include deleting temporary files. Before resetting Outlook, remove these files using Disc Cleanup or a comparable programme.
Online repair: Try Microsoft Office's online repair feature if everything else fails. This allows you to automatically download and replace any missing or damaged files to resolve installation problems
The majority of issues you can run into when installing Microsoft Outlook should be resolved by following these instructions. Updating your drivers and operating system can also prevent compatibility problems.
Wrapping up, setting up Microsoft Outlook is rather simple! To download it to your device, simply follow the instructions provided in this post.
Once you've finished, make use of its features. It effortlessly connects with other Microsoft Office applications and is user-friendly. It also has functionality for organising contacts, managing tasks, and arranging calendars.

Let’s talk about the future, and make it happen!

 Pricing
Calculator
Pricing
Calculator
 Power
Power
 Utilities
 VMware
Private Cloud
VMware
Private Cloud VMware on
AWS
VMware on
AWS VMware on
Azure
VMware on
Azure Service
Level Agreement
Service
Level Agreement